AWS VPC
Abstract
Reviews
In this post we’re going to walk through the core concepts of AWS Virtual Private Clouds (VPCs) in the context of an analogy.
Our main objectives are:
a) Talk about each core component from a conceptual / analogy standpoint
b) Explain each core component’s role in context of VPCs
c) Cover the steps necessary to set up each component
Here’s what we’ll be diving into:
Overview
The natural evolution of most AWS users, at least the ones I know, tends to be:
- Using S3 for file storage
- Computing/Hosting on EC2
- Realizing that the next step requires a huge learning investment
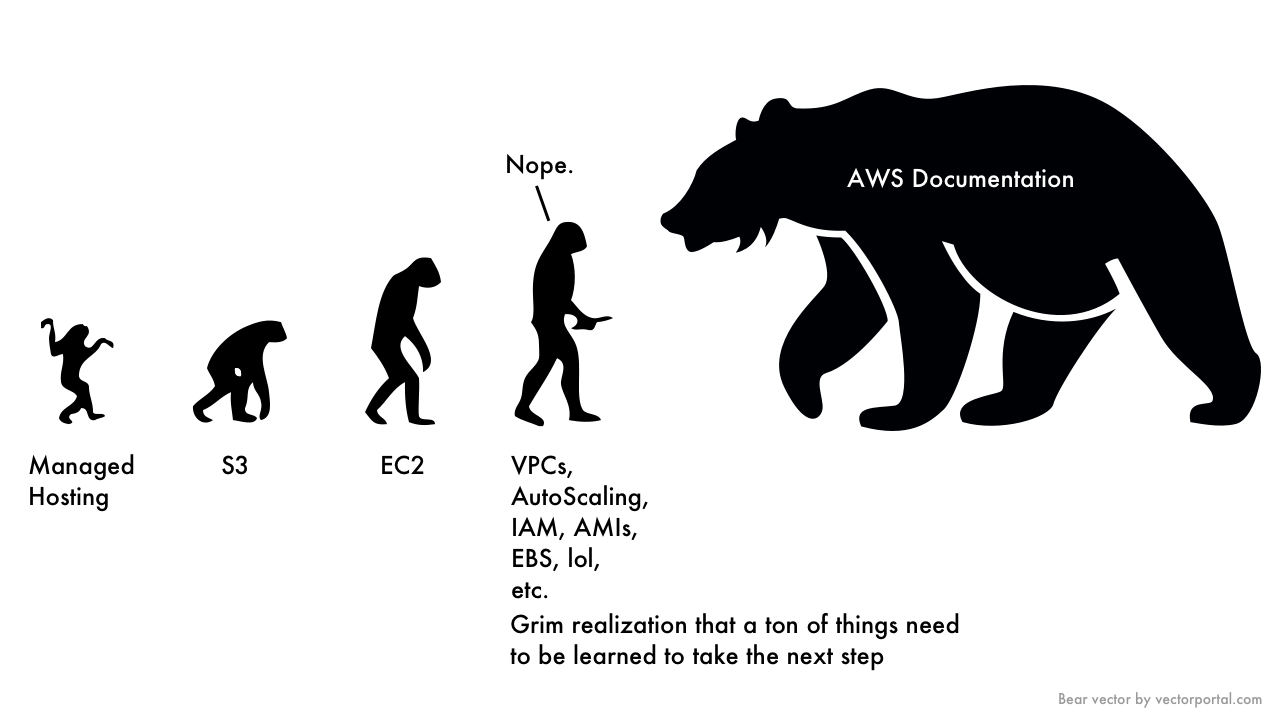
Generally Step 3 is encountered at VPCs. During some late night code spelunking, you finally face the fact that the EC2 docs keep mentioning “VPCs.” Actually all the docs you’re diving through - autoscaling, load balancing, etc. keep bringing VPCs up. Supposedly they’re “best practice” and “highly recommended.”
So… you click the link to the Docs. And holy shit. There’s a forest of links and assumed knowledge. You can’t even read a paragraph without having to open another AWS doc page, and then another, and then a wiki page and then more.
The main problem is that by the time you finally gain a grasp on what half the terminology is, you’ve forgotten why you’re even learning it. Why do I need a VPC? What’s the main concept here? What’s the point?
So that’s what we’re going to do today. This isn’t a technical index or rote set of instructions. It’s an attempt at a compass to help hit the cardinal directions of VPCs - in English. To give enough knowledge to operate professionally and in best practice. So let’s begin with our first main question…
What Are We Trying to Achieve With VPCs?
When we start using AWS we probably don’t want all of our servers, services, etc just thrown into a big melting pot. In this type of ecosystem:
- everything shares the same network
- everything can step on everything else’s toes
- resource management becomes an army of naming conventions
Now, this can work if you’re just using S3, a random EC2 instance or experimenting. But when we go to build a serious cloud infrastructure, whether for data, for an app, etc, this Wild West ecosystem isn’t going to cut it.
That still doesn’t answer the question - why do we need a VPC?
Simply put - because we need control.
Control over organization of resources.
Control of security.
Control of traffic between our services.
Control to keep differing architectures completely separate from each other.
Ever played a game like Sim City? In this game you assume the role of “the Mayor” and are given an open plot of land to build a city. You can build residential, commercial, industrial buildings, city infrastructure like roads, etc. Building out an AWS infrastructure without a VPC is like building out a city with no rhyme or reason.
Some commercial buildings are in the middle of nowhere. Some residential houses are right next to airports. Sometimes there are roads. Sometimes not. There’s too many electric buildings because maybe we forgot someone else had come in and build one already. Anyone from anywhere can get in.
This carries over to our VPCs. Without a VPC, we just have everything kind of anywhere. Granted AWS does force things into a default VPC at the very least, but it’s still basically “anywhere.” Everything is public. Everything in the same network. Everything on the same routing tables. It’s more of a Wild West style landscape than it is a city.
Also, what if we need to build a brand new city? Would we build it right in context of the existing city? No! Similarly if we need to build another architecture we don’t want to just build it right in context of our other one!
Note
(Pre-VPCs, it was a true Wild West. Everything was publicly addressable via the internet regardless of the AWS Account. This era was known as EC2-Classic.)
For the rest of this post, the only assumption that we need to hold is that we’re sticking to one region and availability zone. We’ll bring those back into the fold at the end.
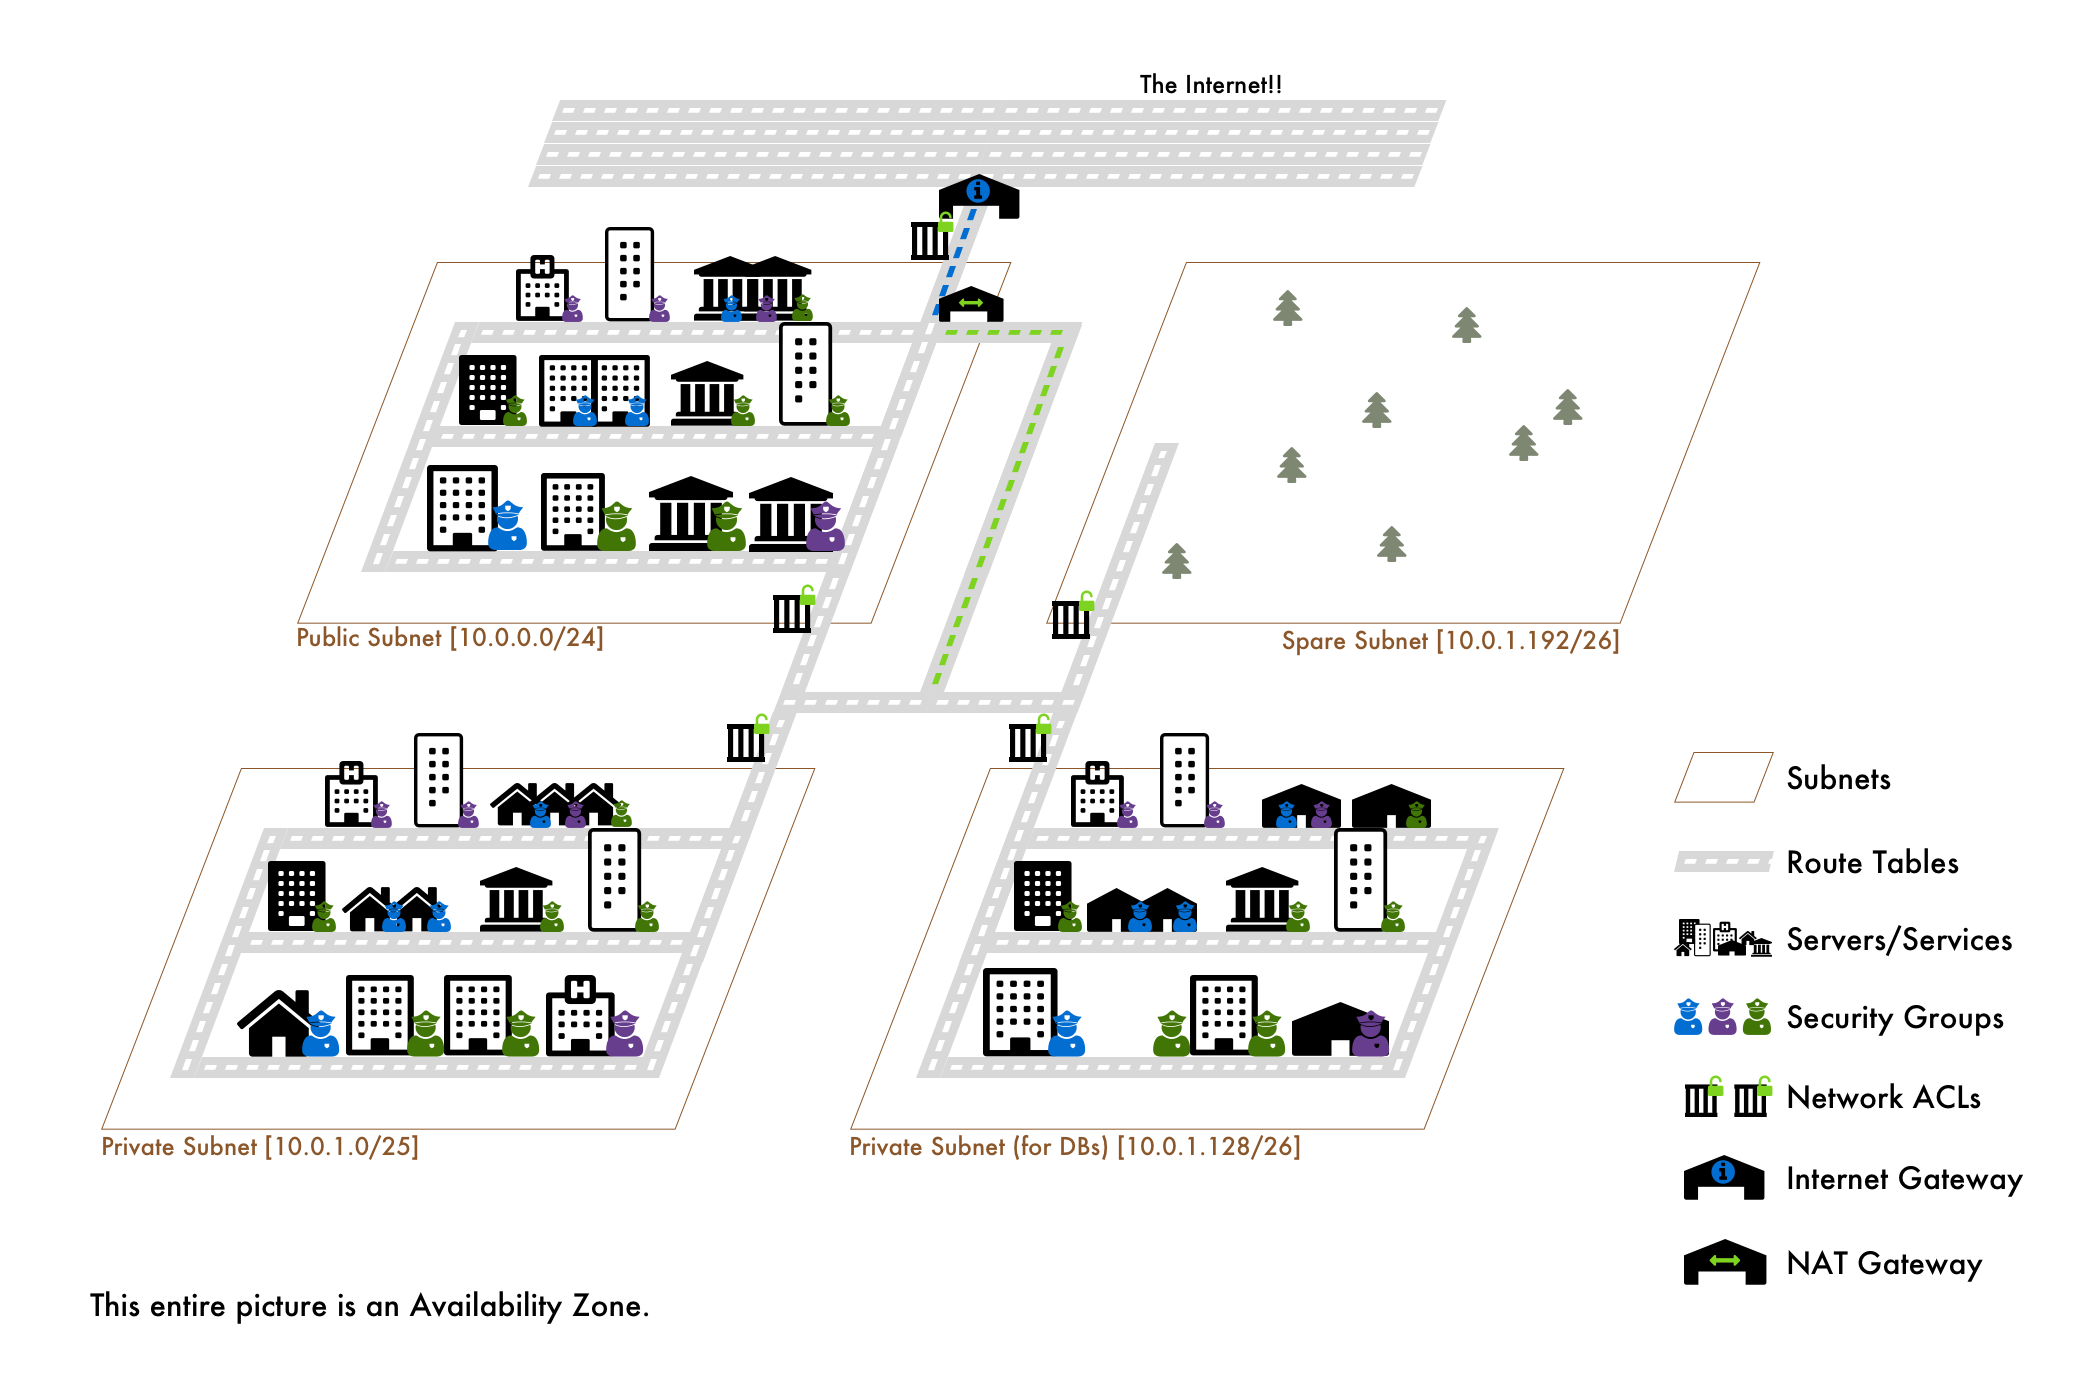
Before we deep dive, here is the entire analogy in one picture:
The AWS Account
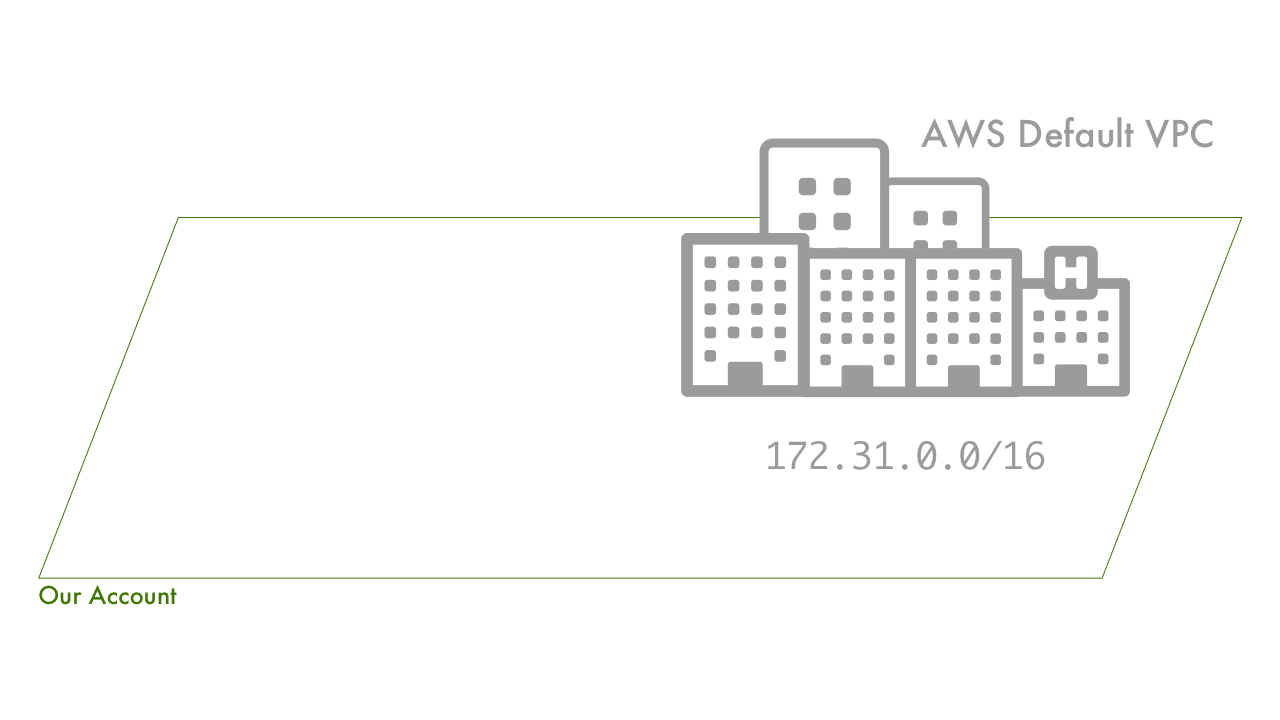
With respect to the analogy we’re building, the account is our wide open landmass. The only defined area of this land is the default AWS VPC at 172.31.0.0/16.
The VPC: “The City”
Given our wide open landmass, we now want to define a portion of it that will be the boundaries, or city limits, for our new city. How can we do that? Well let’s use a range of postal codes like 98101 through 98191. That postal code will represent a defined amount of land. No other cities can be here.
For VPCs, instead of a range of postal codes we define a range of IP addresses. We do so with CIDR block notation. Right now 172.31.0.0 through 172.31.255.255 (/16 specifies that range) are taken up by the default AWS VPC, so we can’t use those. Also, we should stick to one of the RFC1918 ranges, so let’s roll with 10.0.0.0/x.
the “/x” is subnet mask, which in practical day-to-day and for our purposes just defines a range of IP addresses that belong to the same subnetwork.
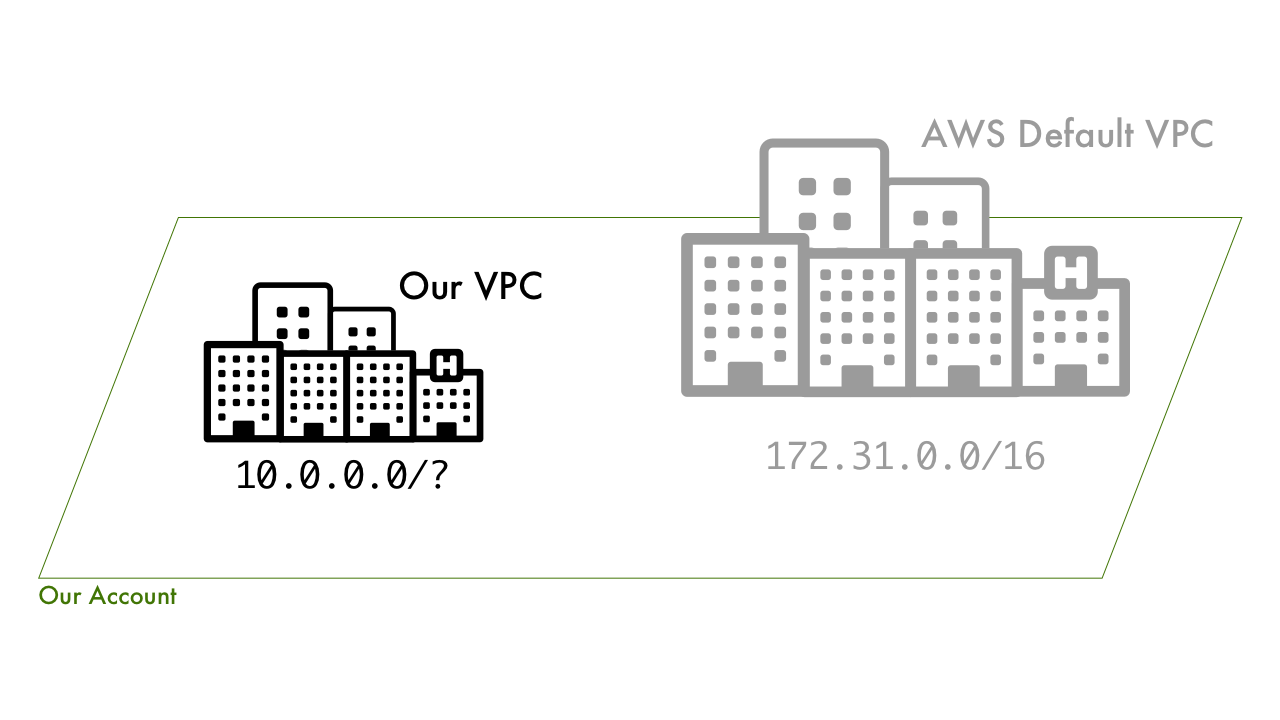
So we’ve picked our range. The next question is how big does our VPC need to be? More specifically, how many IPs do we want available for assignment? Once this decision is made, we’re locked into that IP range. A created VPC’s CIDR block can’t be modified, so whatever range of IPs you’ve selected are what we’re stuck with. For example, if it’s too small or we need different tenancy… then you have to migrate into a new VPC.
We’ve decided on the 10.0.0.0/x range so we have the entire 10.0.0.0 through 10.255.255.255 range to choose from. However, I doubt we want 16 million IPs for this one VPC. After all, we may need to define other VPCs or someone on our team may need to (if using 1 account and multiple IAM users).
Let’s make our VPC small and go with 10.0.0.0/21 this will give us everything from 10.0.0.0 through 10.0.7.255, or 2048 IPs. This will leave 10.0.8.0 - 10.255.255.255 open for future VPCs in this range (not to mention the 172 and 192 blocks).
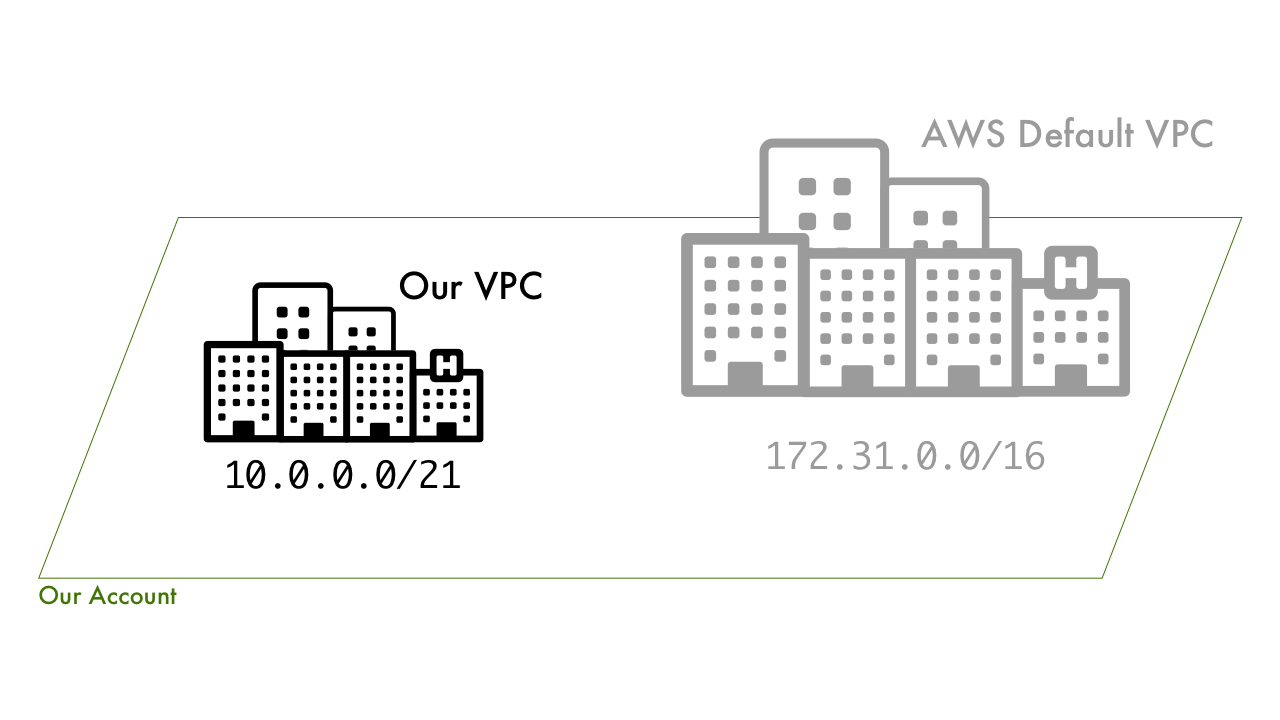
How big should our VPC be? Depends on how many services / servers we predict (or know) that we’ll need.
This range also leaves us a nice clean pattern to split up into 31 other VPCs for our 10.0.X.0/21 range. Maybe we’ve decided that 10.0.X.0/21 represents a set of development VPCs. The pattern for allocating these would look like:
10.0.8.0/21
10.0.16.0/21
10.0.24.0/21

and so on all the way up to

10.0.248.0/21
The How To
The creation of a VPC is hilariously simple in comparison to the concept behind it. First off, this example assumes you’re in us-east-1 aka N. Virginia.
- Navigate to the VPC section of the AWS console
- Click Your VPCs
- Click Create VPC
- Give it a Name Tag:
VPCity - Give it an IPv6 block if so desired (auto assigns a
/56IPv6 Block)
AWS will auto assign a ::/56 IPv6 CIDR block to the VPC. This is 256 ::/64 subnets of 18,446,744,073,709,551,616 IPv6 addresses!
- Leave Tenancy to
Default
If physical servers are like apartment buildings, then default tenancy means we share the space with other tenants. dedicated means we get the whole apartment building to ourselves.
The Subnets: “Postal Codes”
Our city limits are defined through a range of postal codes, or segmented geographical areas. However, it’s a good idea to split this space up even more so rather than start building willy-nilly. Therefore, we’d next seek to divide up city’s range of postal codes into individual postal codes.
For example, even though our city might include postal codes 98101 through 98191, we don’t want to treat that all as just one big space. While putting the airport on the same street as residential could be funny, we probably shouldn’t do it. So, let’s say we split up the first postal codes like so:
98101 - Commercial district
98104 - Government district
98133 - Private Warehousing district
In VPCs, we don’t want to treat the entire IP range of 10.0.0.0 - 10.0.7.255 (10.0.0.0/21) as one big network. Similar to splitting up our range of postal codes into individual ones, we split our VPC’s IP range up into smaller networks, or Subnets. This way we can logically organize and protect our resources. Let’s say we’ve decided on 4 subnets:
10.0.0.0/24 - Public Subnet for Web Servers (10.0.0.0 - 10.0.0.255 256 IPs)
10.0.1.0/25 - Private Subnet for API Servers (10.0.1.0 - 10.0.1.127 128 IPs)
10.0.1.128/26 - Database Subnet for DBs (10.0.1.128 - 10.0.1.191 64 IPs)
10.0.1.192/26 - Spare Subnet (10.0.1.192 - 10.0.1.255 64 IPs)
Note
In each subnet, AWS reserves 5 IPS, the first 4 and the final. So in our public subnet, it’d be 10.0.0.0, 10.0.0.1, 10.0.0.2, 10.0.0.3 and 10.0.0.255.
CIDR Note
Seeing 10.0.0.0/21 and then 10.0.0.0/24 may be a bit odd. Aren’t those the same address?? Remember, these are ranges. So 10.0.0.0/24 is in the range of 10.0.0.0/21.

Aside: CIDR Blocks and Subnet Splitting
In a practical, human understandable notion: something like 10.0.0.0/x is a format to define a range of IP addresses. How do you come up with these ranges? 3 steps:
a) Go read up on CIDR notation in depth
b) Decide on the size of your subnets
c) Use a subnet calculator like this one or this one to create the ranges
Yes there’s much more to CIDR and the way subnet masks work. But FFS, sometimes it’s nice to just get the “how I would use it” rule of thumb vs. the history of the internet.
The How To
Once again, easier done than said/explained/understood. Remember, this example assumes you’re in us-east-1 aka N. Virginia.
- In the VPC console, go to Subnets on the side panel.
- Click on Create Subnet
- Give it a Name Tag:
vpcity-a-public - For Availability Zone, choose
us-east-1a
We’ll talk about Availability zones in context of this analogy at the end. For now though, it’s simpler to explain the rest of the VPC concepts first.
- For IPv4 CIDR block type
10.0.0.0/24 - For IPv6 CIDR block choose Specify a custom IPv6 CIDR and leave
00as the value.
Without diving into IPv6 too much, the simplest thing to do is to iterate this value by 1 for each subnet. So the next one will be 01. And then the next will be 02. All the way until FF. Each of them with 18,446,744,073,709,551,616 host addresses…
- Rinse and repeat for the above ranges:
10.0.0.0/24 - vpcity-a-public (we just did this one)
10.0.1.0/25 - vpcity-a-private
10.0.1.128/26 - vpcity-a-db
10.0.1.192/26 - vpcity-a-spare
And there ya have it.
The Route Tables: “Roads”
We’ve defined our separate postal codes within our city. Everything is split into geographical regions. Now we need to give “traffic” a way to move in and out of these different areas. What do we do? We build roads. So a postal code has a series of roads that allow traffic to move in and out of it.
In VPCs, even though we have these different subnets, we need to allow traffic to flow through them. We do this with Route Tables. A Route Table is just a list of CIDR blocks (IP ranges) that our traffic can leave and come from. By default, newly created Route Tables will have the CIDR of our VPC defined. This means that traffic from anywhere within our VPC is allowed.
In addition to a list of IP ranges that our Route Table connect traffic between, it also has Subnet Associations. Simply put, these are “which subnets use this route table.” For our city analogy it’d be “which postal codes are connected to these roads.” A Route Table can have many subnets, but a subnet can belong to only one Route Table.
All comparisons aside, it can be summed up as - A subnet is associated with a Route Table and the Route Table dictates what traffic can enter and leave the subnet.
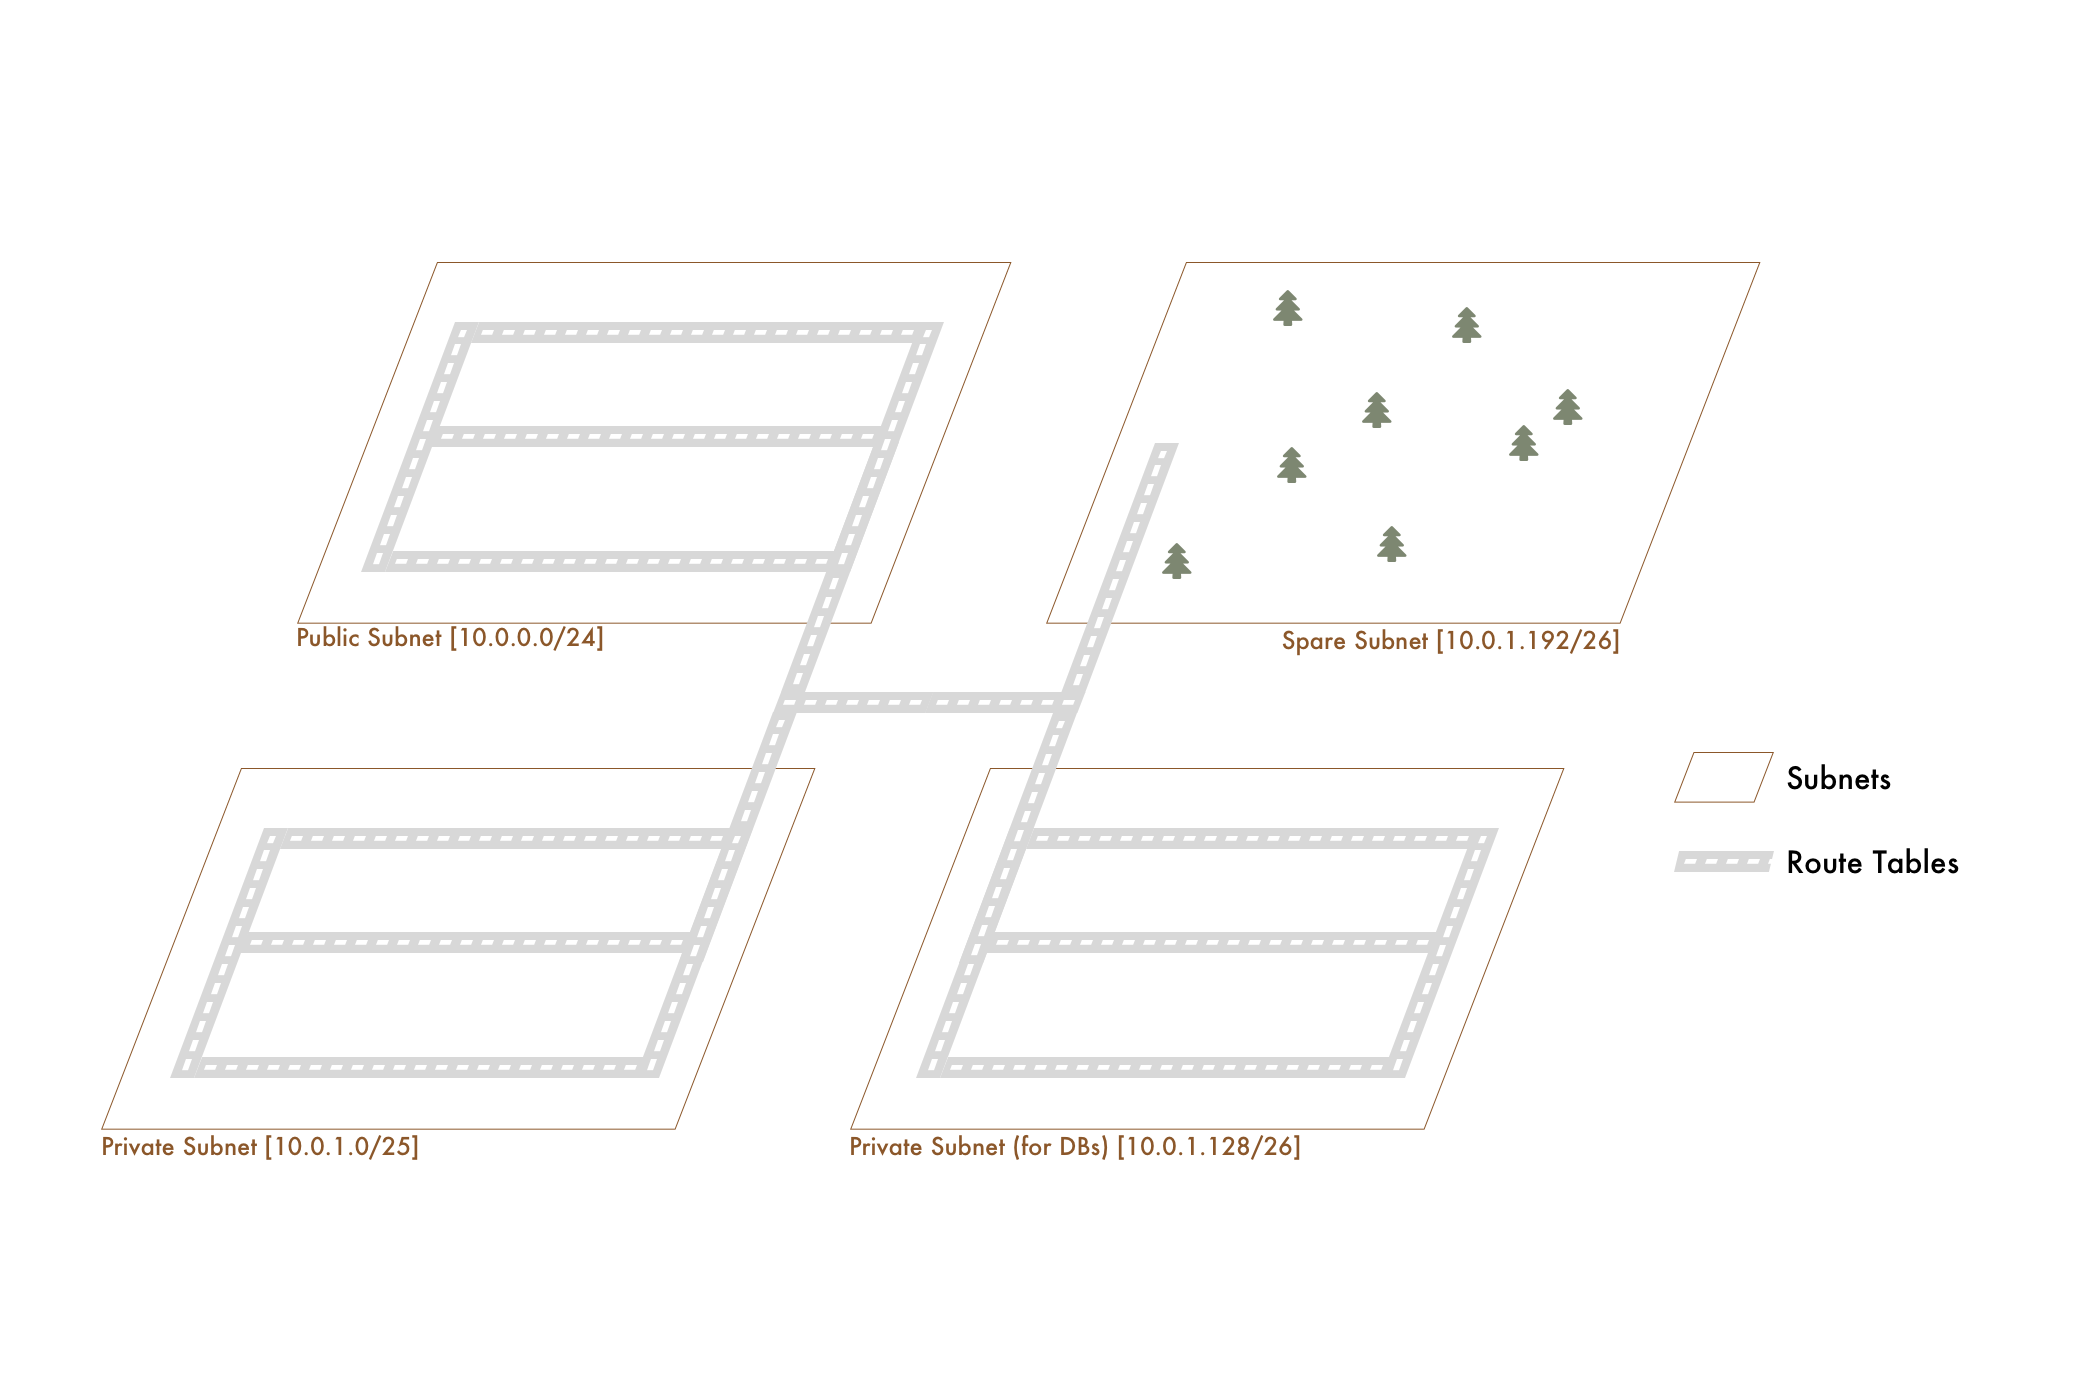
Public Subnets and Internet Gateways
Since the default Route Table starts with all subnets only allowed to route to traffic within the VPC, it’s known as a private subnet. How do we make it public? Well first, what’s public even mean? It just means it can connect to the internet. How do we do that? We just tell our Route Table it’s allowed to do so by attaching an Internet Gateway.
An Internet Gateway is … well a portal to the internet. In terms of an analogy, think of it like the highway. First off, remember back to our fictional postal codes:
98101 - Commercial
98104 - Government
98133 - Private Warehousing
Imagine that our Government and Private Warehousing postal codes both share a series of roads that only navigate within our city. This makes them private. Now, imagine that one of our commercial codes uses a series of roads that also connect to both the rest of the city AND the highway. That makes it public.
Similarly, a subnet that’s associated with a Route Table that’s connected to an internet gateway is public. A subnet with a Route Table that’s not connected to an internet gateway is private.
"Private" Road Infrastructure (no connection to highway)
"Public" Road Infrastructure (connection to highway)

98101 - Commercial (Uses Public Roads)
98104 - Government (Uses Private Roads)
98133 - Private Warehousing (Uses Private Roads)
The connection to the highway would be like the Internet Gateway.
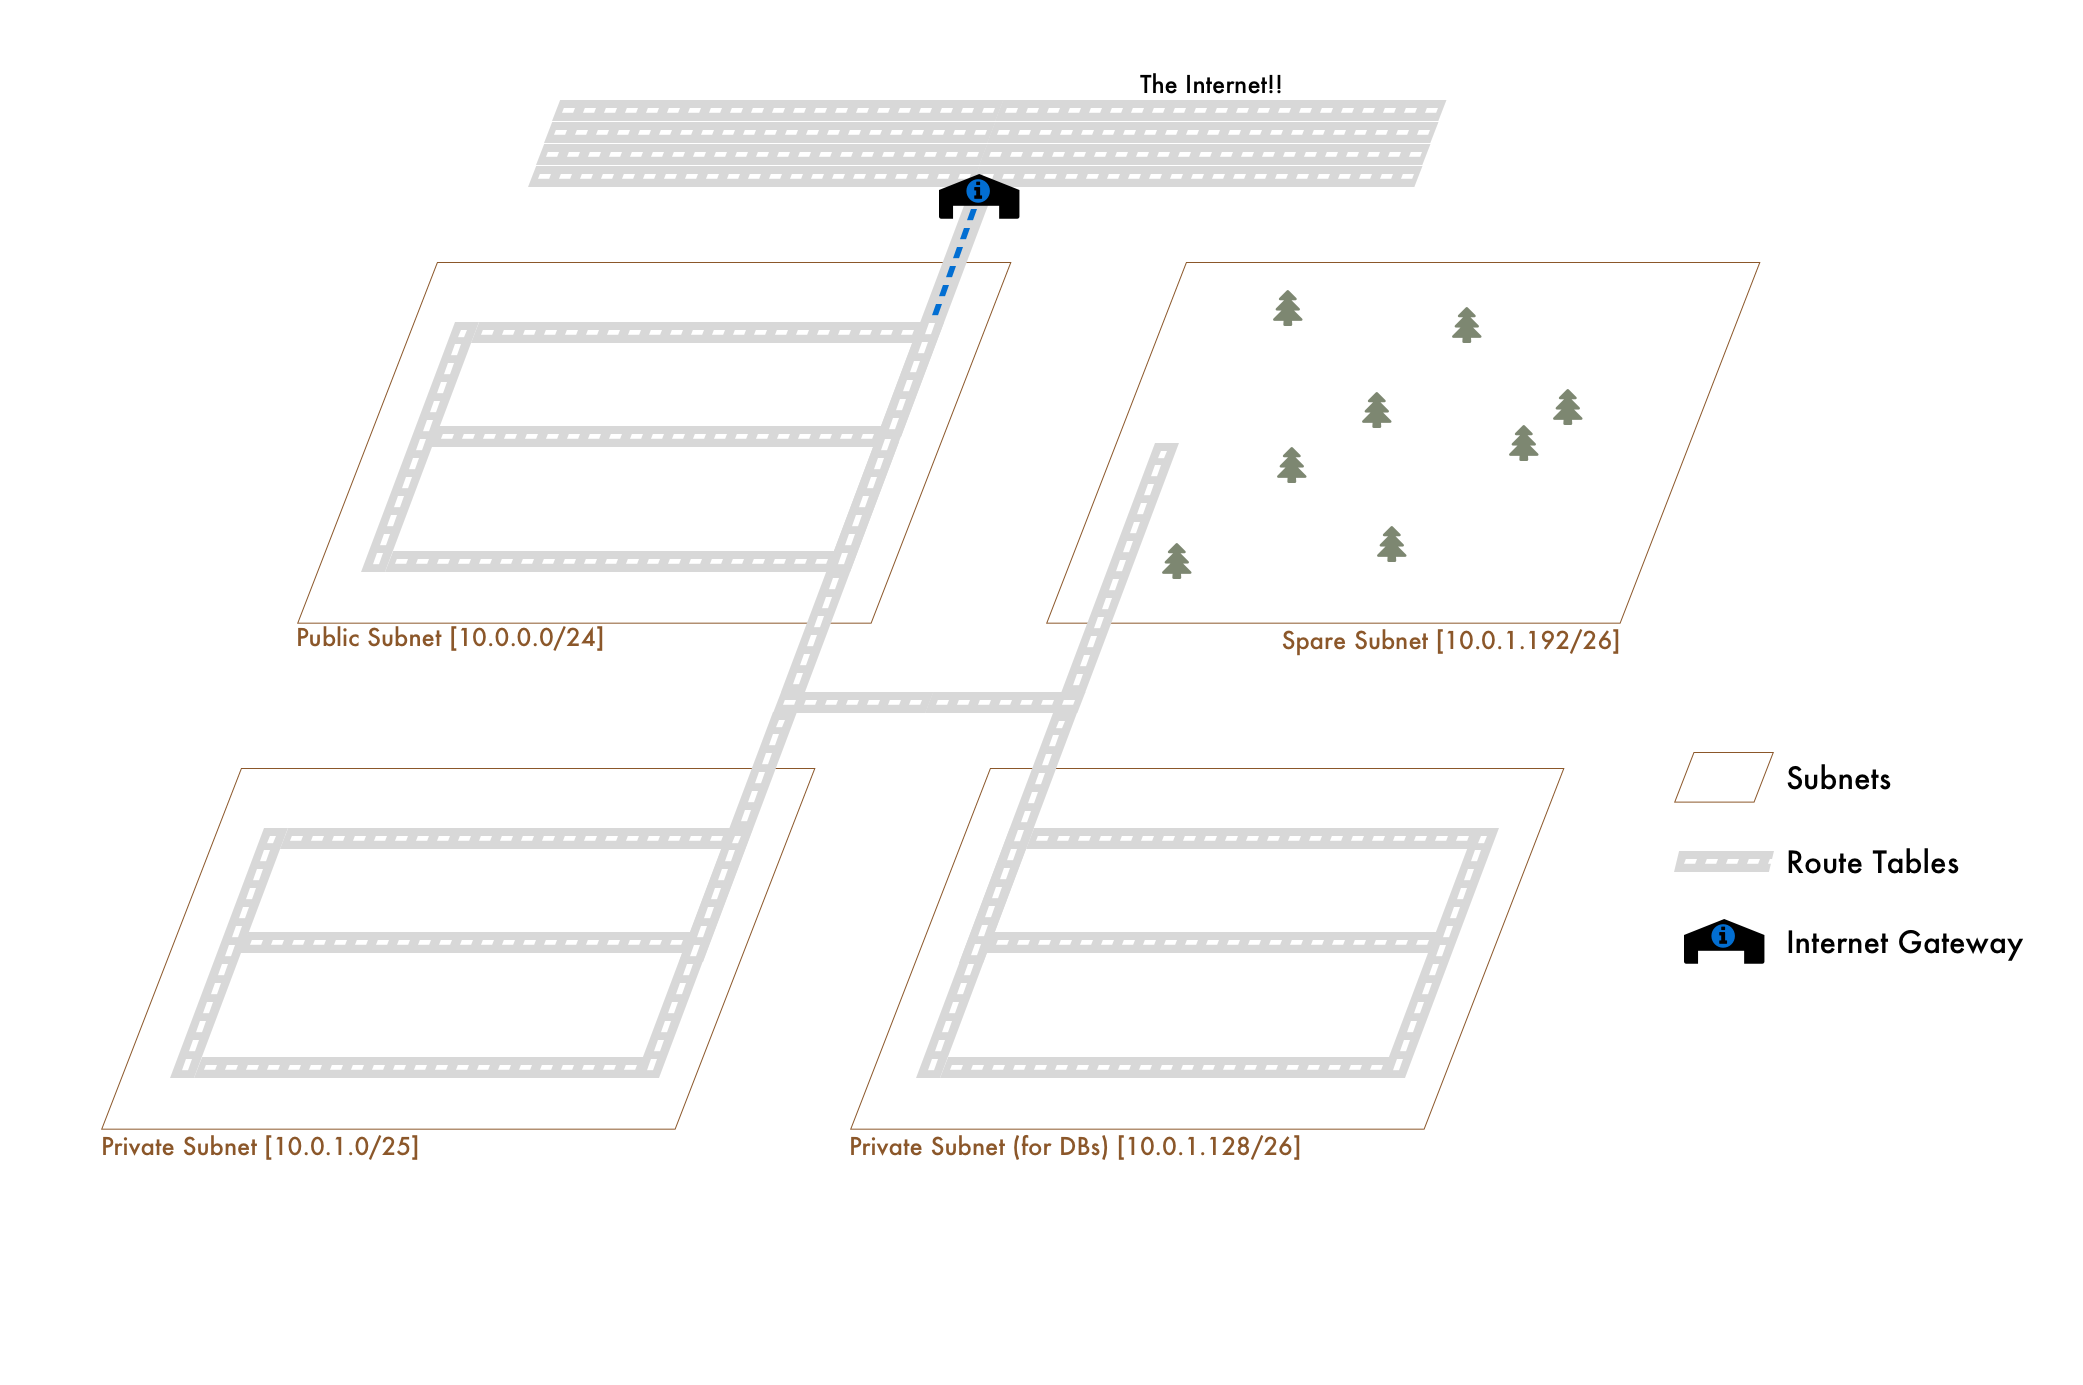
To cross back over to Subnets, our Route Tables might look like:
Private Route Table
-------------------
10.0.0.0/21

Public Route Table
-------------------
10.0.0.0/21
0.0.0.0/0 (internet)
And then our subnets
10.0.0.0/24 - Public (Public Route Table)
10.0.1.0/25 - Private (Private Route Table)
10.0.1.128/26 - Database (Private Route Table)
10.0.1.192/26 - Spare (Private Route Table)
Private Subnets and NAT Gateways
In our city, traffic in the Government and Private Warehouse postal codes can’t get to the highway. Traffic can only move about within the city. What if it needs to leave? Instead of building more highway on-ramps, we’d probably just tell the traffic to (a) navigate to the government postal code and (b) get on the highway from there.
That’s essentially what a NAT Gateway does. When our Subnets connected to the Private Route Table need access to the internet, we set up a NAT Gateway in the public Subnet. We then add a rule to our Private Route Table saying that all traffic looking to go to the internet should point to the NAT Gateway. The tables might look like:
Private Route Table
-------------------
10.0.0.0/21
0.0.0.0/0 (nat gateway)

Public Route Table
-------------------
10.0.0.0/21
0.0.0.0/0 (internet)
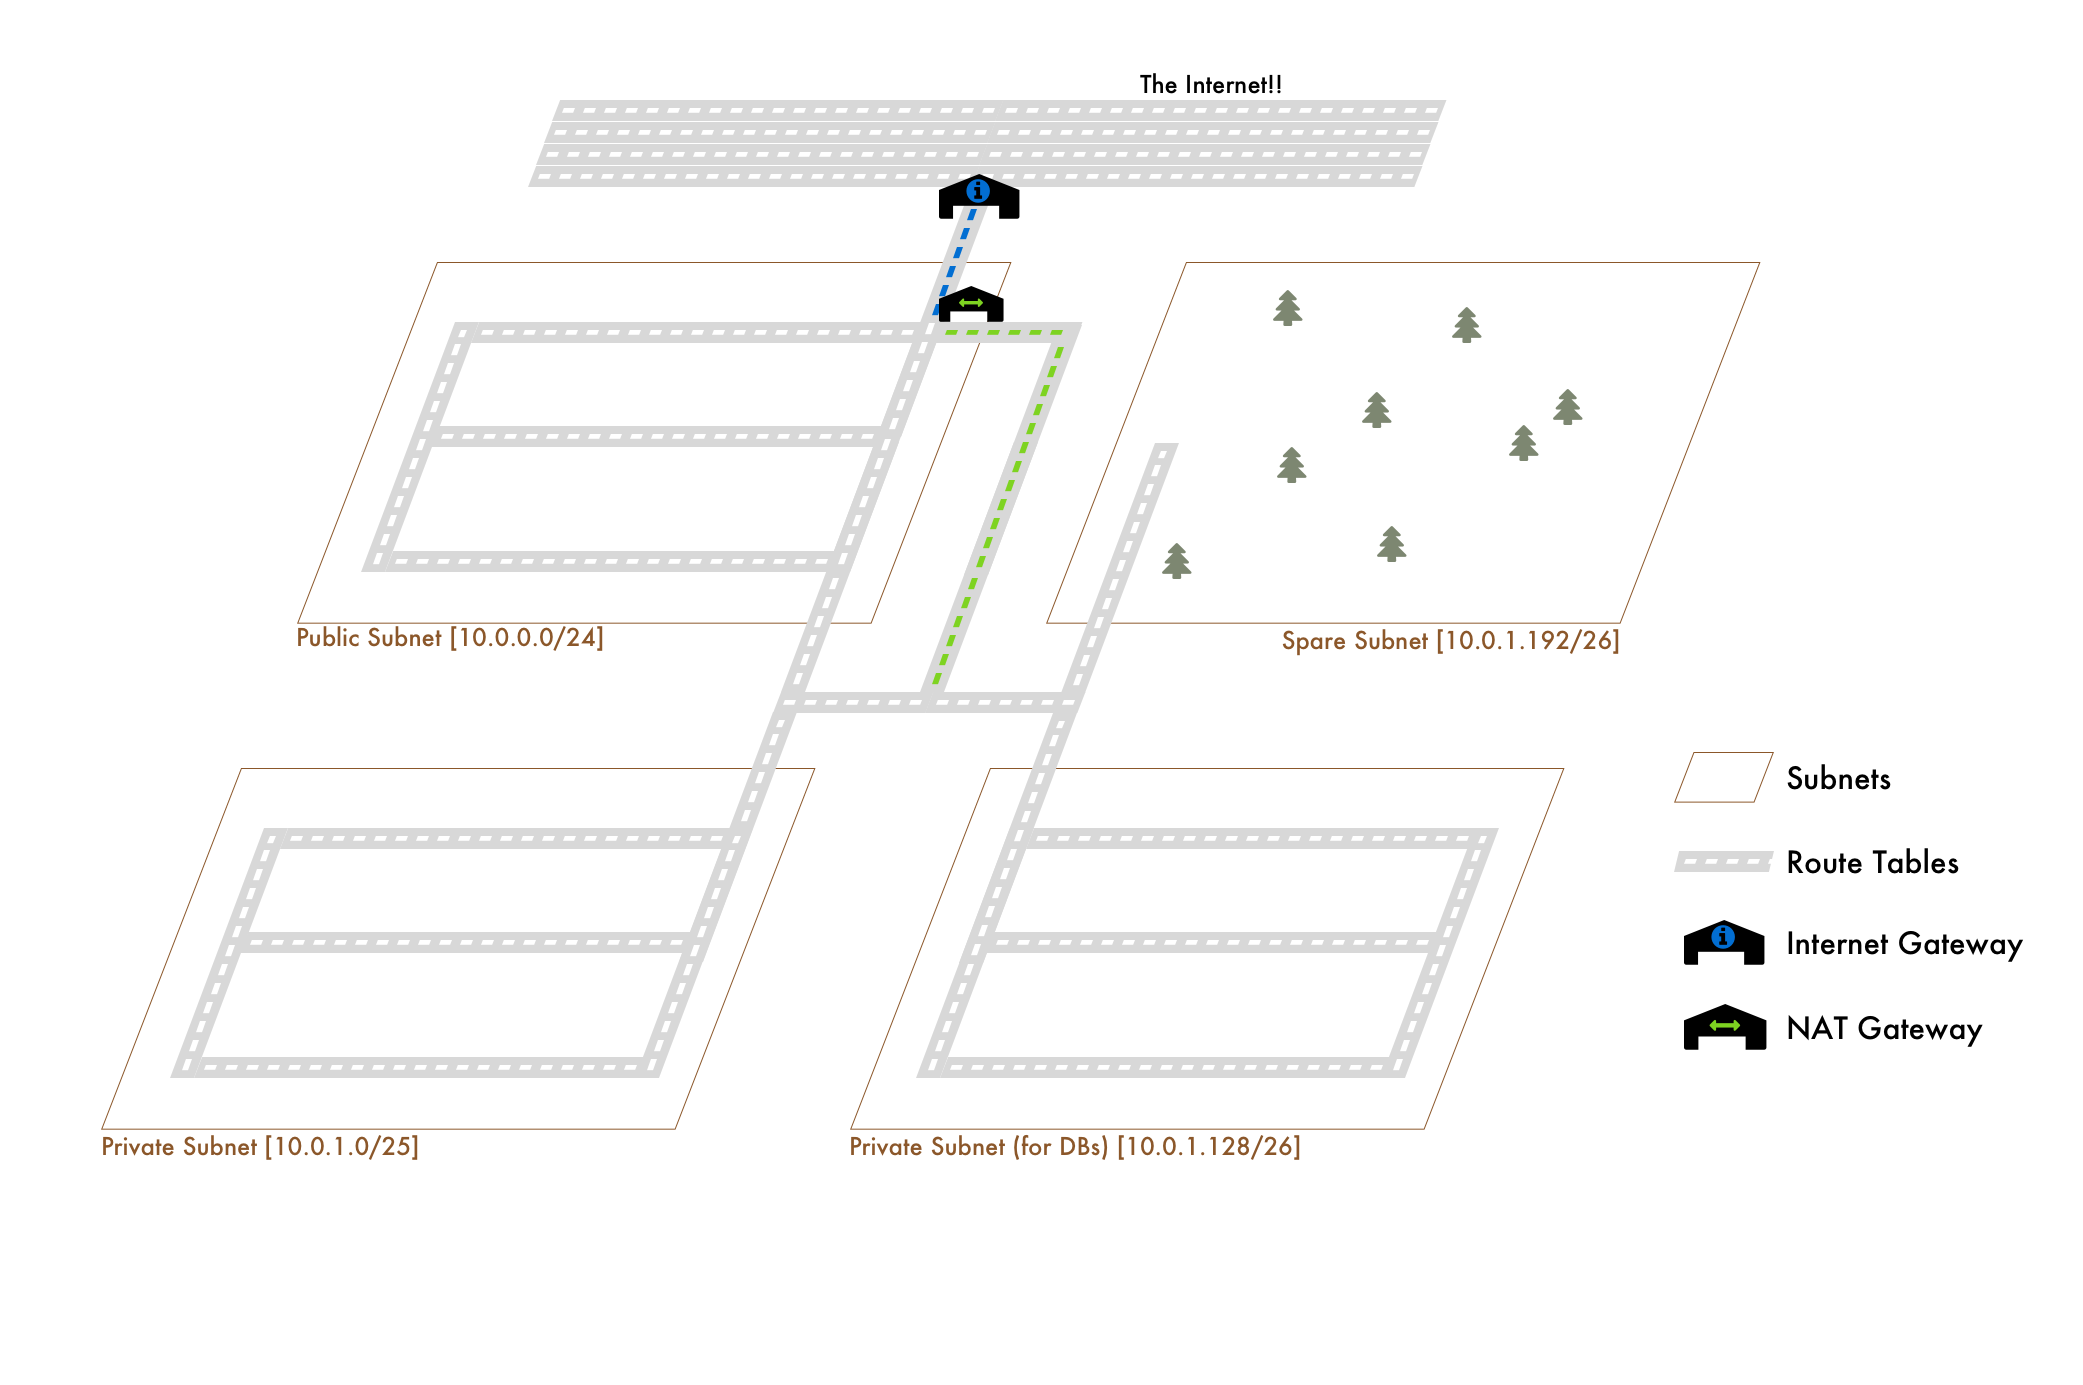
We could also do this with NAT Instances but NAT Gateways are recommended. Plus, this post is getting lengthy enough as it is.
Other Gateways
Beyond the NAT and Internet, VPC’s also give us the ability to
a) connect our VPC to off-site data centers with VPNs
b) connect to other VPCs via VPC Peering Connections
These two topics would best be done in another post rather than crammed into a core concepts post. Furthermore, I don’t really have good analogy for VPNs… since they’re taking you to another world. The Analogy for VPC Peering Connections would be like direct roads or freeways to another City.
The How
The Public Route Table
- In the VPC console, click on Route Tables in the side bar
- Click Create Route Table
- Give the Name Tag something like
public-roads - Select the
VPCityVPC (or whatever you named it) - Click Yes, Create
Now we need to create the Internet Gateway
- In the VPC console, click on Internet Gateways
- Click Create Internet Gateway
- Give it a Name Tag, something like
public-roads-igw - After it’s created click on Attach to VPC
Now to set it up on the Route Table
- In the VPC console, click Route Tables
- Select the Route Table that we created
- In the bottom tabs, under Routes click Edit
- Click Add another route
- For Destination input
0.0.0.0/0 - For Target select our newly created internet gateway
public-roads-igw - Click Save but don’t leave this page yet…
Almost done, last thing to do is to associate it with the subnets that we’d like to use this route table.
- In this same page, with our Route Table Selected, click Subnet Associations
- Click Edit and select our
vpcity-a-publicsubnet, or whichever subnet you’d like to be public
Notice that our all of our subnets are currently associated with a Route Table called “main.” This is just the default Route Table created when our VPC was made. It’s a private one by default and only allows traffic within our VPC.
The Private Route Table
While we could just use the default, here’s the quick run down on a private one:
- In the VPC console, click on Route Tables in the side bar
- Click Create Route Table
- Give the Name Tag something like
private-roads - Select the
VPCityVPC (or whatever you named it) - Click Yes, Create
Now we need to create the NAT Gateway
- In the VPC console, click on NAT Gateways
- Click Create NAT Gateway
- Select our Public Subnets we want our NAT gateway to sit in:
vpcity-a-public - Click Create New EIP
NAT Gateways require an Elastic IP Address
- Click Create a NAT Gateway and View NAT Gateways (refresh the screen)
These take a bit to setup, but once they’re live, you attach it to the Route Tables in the exact same manner as Internet Gateways.
- In the VPC console, click Route Tables
- Select the Route Table that we created,
private-roads - In the bottom tabs, under Routes click Edit
- Click Add another route
- For Destination input
0.0.0.0/0 - For Target select our newly created nat gateway
- Click Save but don’t leave this page yet…
As before, the last thing to do is to associate it with the subnets that we’d like to use this route table.
- In this same page, with our Route Table Selected, click Subnet Associations
- Click Edit and select our
vpcity-a-private,vpcity-a-dbandvpcity-a-sparesubnets.
And there’s our private subnet with access to the internet. For IPv6 private subnets, we’d only need to:
- Create an Egress Only Internet Gateway
- Select our VPC
- In our Route Table
private-roads, click Edit - For Destination input
::/0 - For Target select our Egress Only Internet Gateway
All IPv6’s are internet accessible by default, so the way you make them “private” is by directing traffic out through an Egress Only Internet Gateway. This means that IPv6 hosts can initiate internet requests outwards (and receive responses), but that we can’t access the IPv6 hosts outside of the VPC. Egress Only meaning, outgoing traffic only.
Network ACLs: “Security Gates”
It turns out we’ve built our city in a very dark time where not everyone can be allowed to just come and go as they please. We need security gates and perimeters outside of each of our postal code areas to ensure only the right traffic is entering and leaving. That means we’ll check traffic as it comes in to see if it’s permitted AND we’ll check as it leaves to make sure it can exit.
In our VPC, these are the Network ACLs. They dictate what traffic is allowed to enter and leave the subnets they’re associated with.
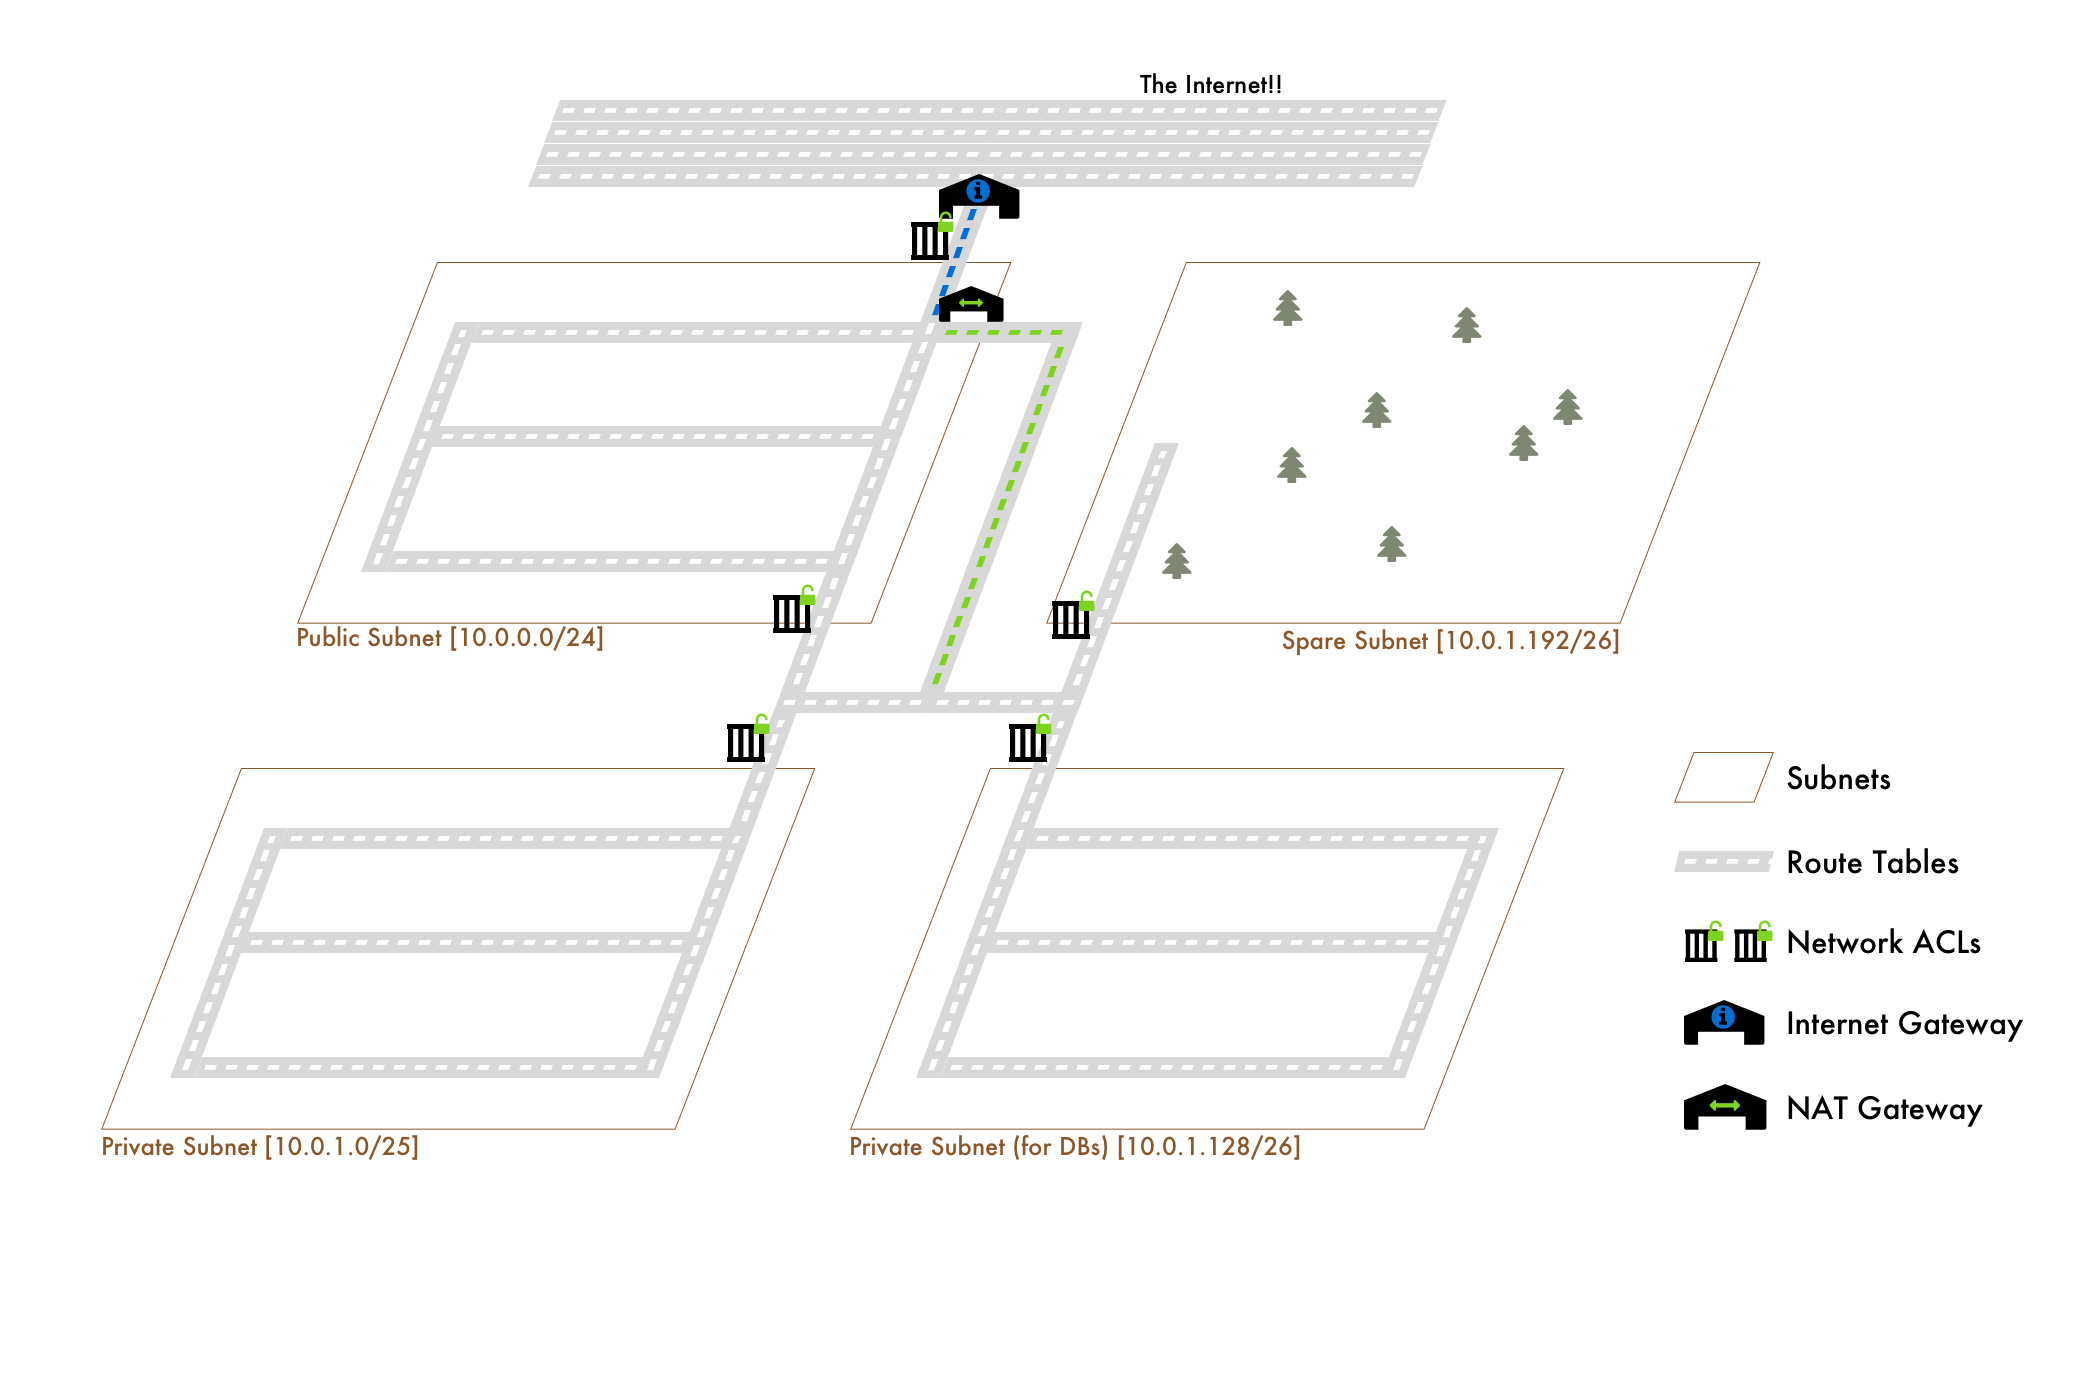
Note
The 2 ACLs on the Public Subnet are the same ACL with 2 rules: one for internet gateway access and one for the rest of the VPC. It was just difficult to visualize the split using only one gate.
They have 3 main properties:
- Inbound Rules - a list of “source” IP address ranges (CIDR blocks), protocols and ports that are either allowed to enter or denied entry.
For example, the default ACL that is created with every new VPC has the rule:
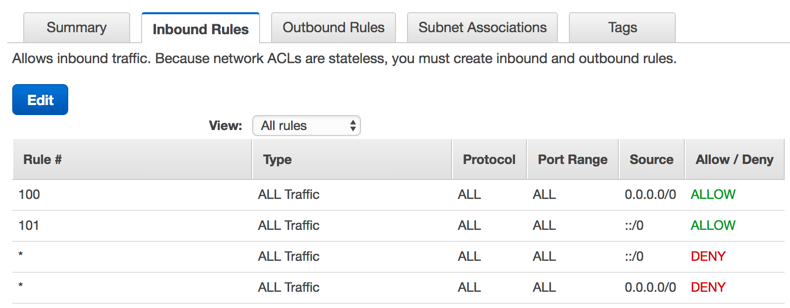
Rule # is just the priority of the rule. Lower number = more priority.
- Outbound Rules - a list of “source” IP address ranges (CIDR blocks), protocols and ports that are either allowed to exit or denied exit.
These work the same as the Inbound except they do the opposite.
- Subnet Associations - a list of subnets that this Network ACL applies to.
Works the same way like the Route Table associations. A Network ACL can apply to many subnets, but a subnet can only belong to one Network ACL.
How are these different from Route Tables?
Route Tables determine if a subnet is reachable; Does the road to the particular postal code exist?
Network ACLs determine if the traffic can enter the subnet; “I got to the government district, but they won’t let me in.”
The How
- In the VPC console, click on Network ACLs in the side bar
- Click on Create Network ACL
- Give it a Name Tag of
vpcity-lax-acl - Click on the ACL and in the bottom select Inbound Rules
From here we can select what we’d like the traffic to be. Right now nothing can enter. If we want them open to all traffic, we can use the same inbound rules as the default:

However if we only wanted specific ranges, we’d replace those CIDR blocks with the ranges we’d only like incoming traffic from.
- Select Outbound Rules
This is what traffic should be allowed to exit. Right now nothing can exit. That means even if allowed traffic from the internet, we wouldn’t be able to respond. If we’d like any traffic to be allowed to leave simply use:
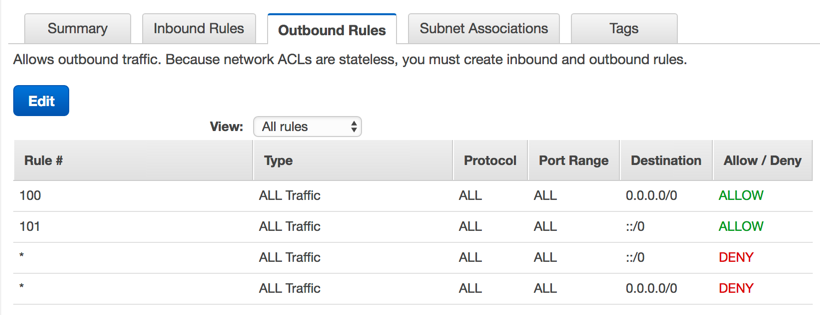
This means any traffic is allowed to leave subnets associated with this ACL.
- For Subnet Associations, select whichever subnets we’d like to use this ACL
Like Route Tables, all subnets are associated with a default Network ACL. So selecting subnets from here will disassociate them from the main one and have them use our new one.
Isn't it bad to have a Network ACL that open??
Even though these ACLs are allow traffic from anywhere, that’s not the end result in our current setup. Our private subnets can only receive traffic from with the VPC due to its route table! So in context of the private subnets, the ACL is really saying “any traffic from anywhere inside of our VPC.” Public subnets on the other hand CAN receive traffic from anywhere.
But, yes, you should lock these down appropriately for the applications expected traffic needs. For example, we could take these further and only allow inbound and outbound traffic from our VPC’s IP CIDR for our Private subnets. At that point it would have similar allowed ranges to our Route Table. For sake of time though, let’s move on.
Servers and Services: “Buildings”
Our city has all sorts of surrounding infrastructure and logic, but we’re missing buildings! When we create these buildings, given that we now have logical, gated and accessible areas, we can group them better. When we create a building it also will receive its own address.
This is the simplest comparison of all. Servers and Services launched into our VPC are the buildings of our city. They receive a “private IP address” when created. We can also setup our subnets to assign “public IP addresses” as well. These are required if we’d like our server/service launched to be able to communicate with the internet via Internet Gateway.
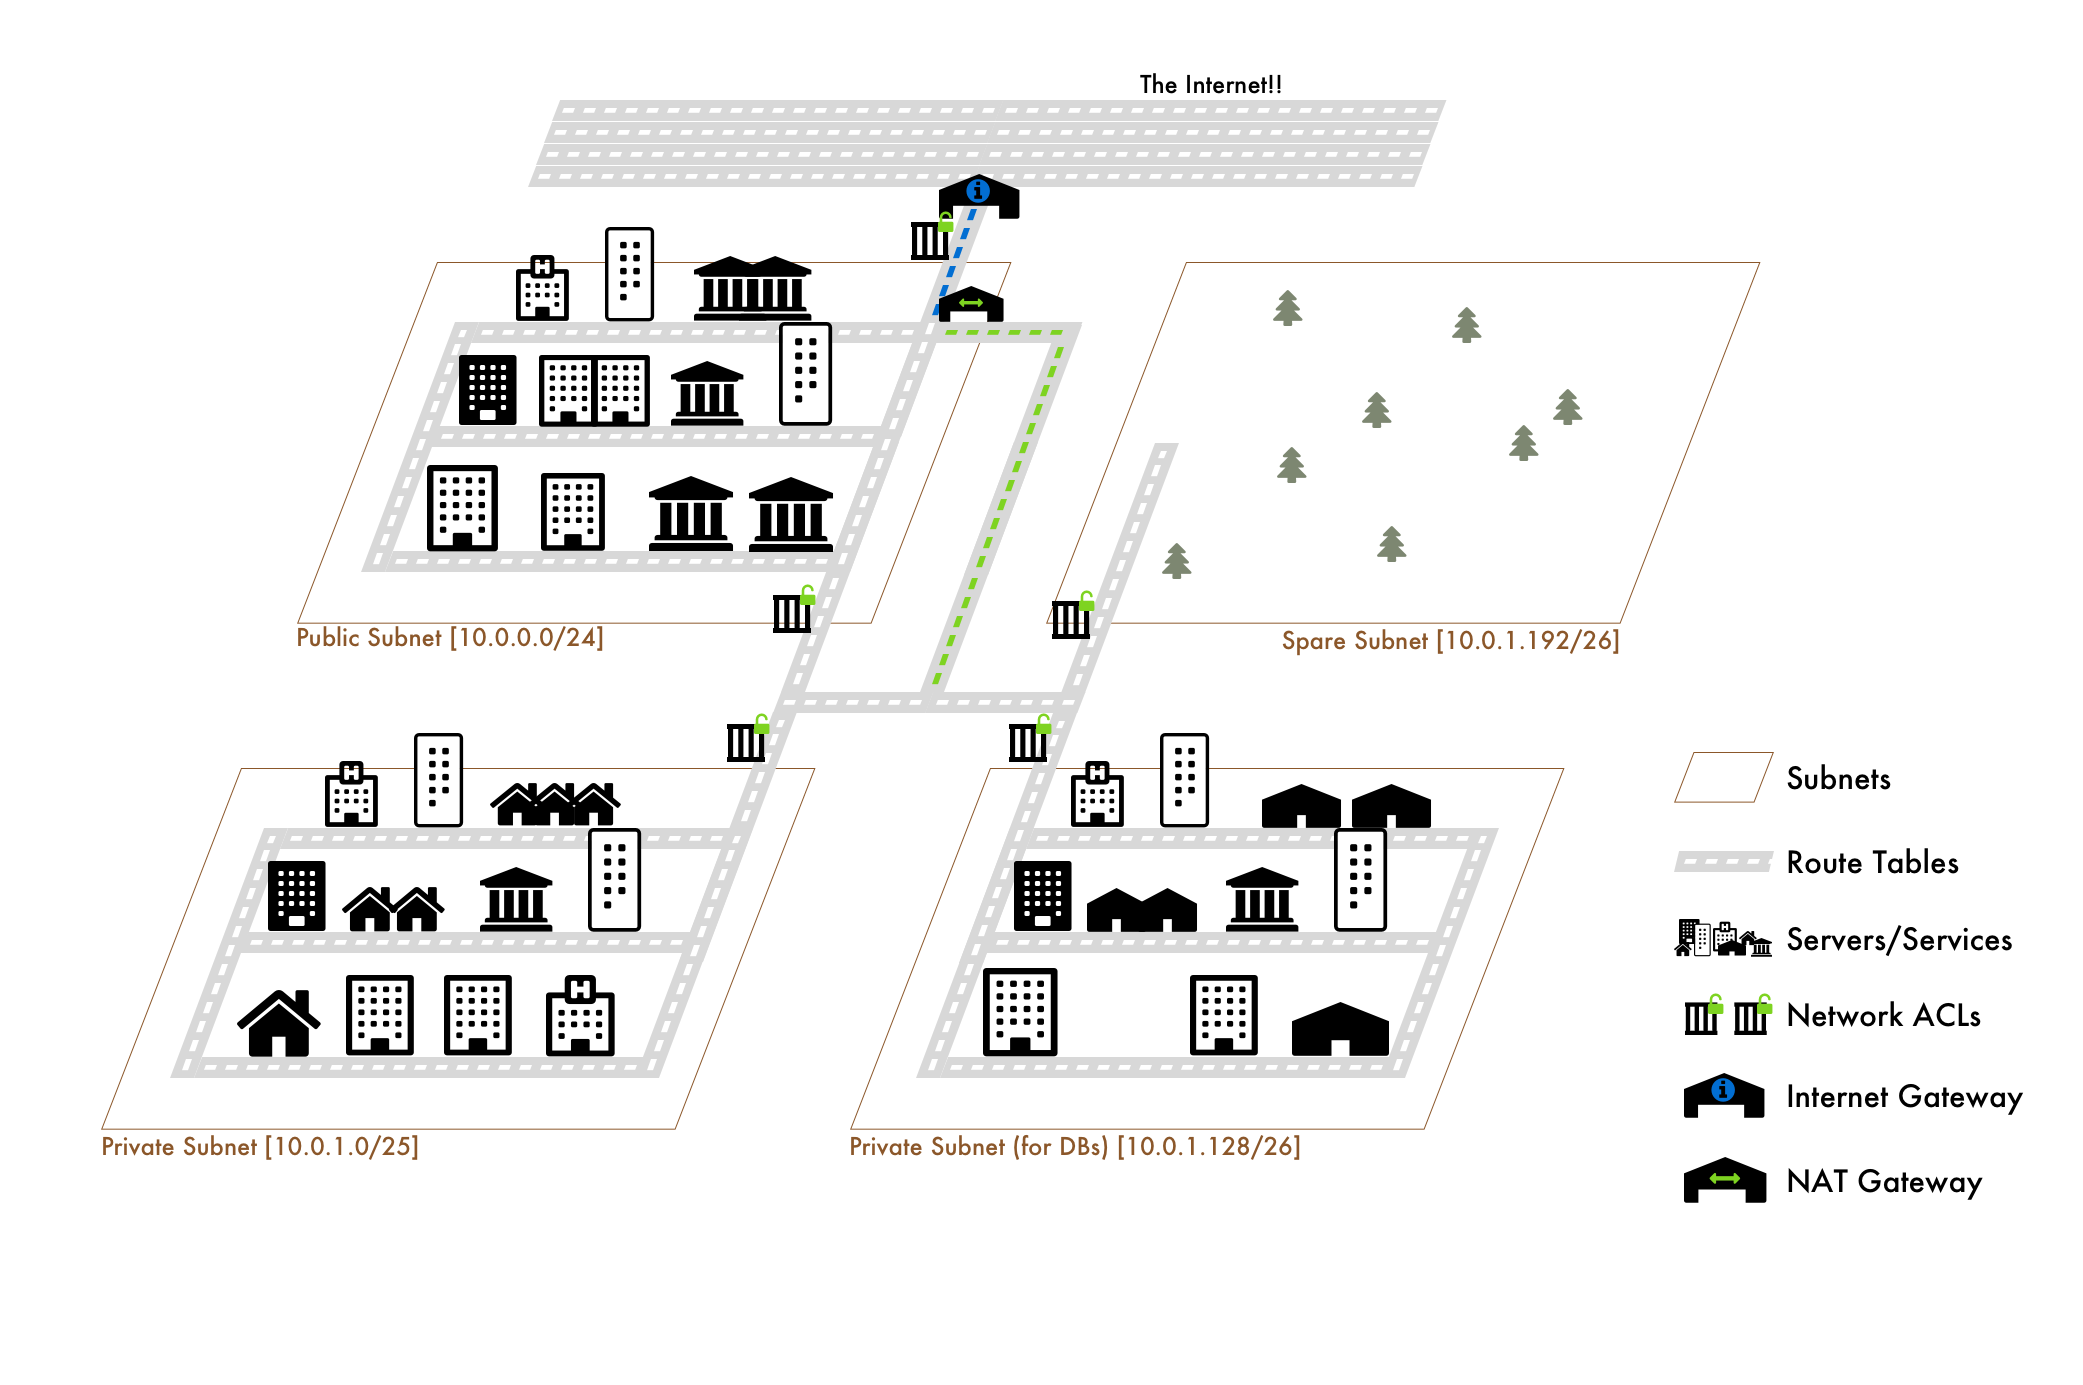
Fun Note 1
The 3rd IP address in the base of the VPC IP range is reserved for a AWS DNS server that handles all of this IP address assignment.
Fun Note 2
We can configure our VPCs to also assign DNS hostnames to our servers/services. So not only would an instance launched have an IP, but it would also have a DNS name of something like “ec2-public-ipv4-address.region.amazonaws.com”.
The How
Whenever launching any provisioned service (like RDS) or EC2 instance, we’ll be asked about what VPC and what subnets to launch them into. Simply select the appropriate VPC and subnet.
Security Groups: “Security Guards”
It turns out that our city isn’t just in a dark time, it’s practically organized chaos. Because of this we have security guards outside of every building. These guards concern themselves with what traffic is allowed to enter and leave the building. They’re not concerned with what traffic is DENIED to enter or leave.
In our VPC, these are our Security Groups. They protect our servers/services at the resource level instead of at a subnet level.

Unlike Network ACLs, Security Groups only care about whether or not traffic is allowed to enter or leave. I’m reiterating this because of how subtle and yet how different this is.
With ACLs, we can explicitly deny traffic coming from a specific IP CIDR block. With Security Groups we cannot. Instead we can only allow traffic from specific IP CIDR blocks.
Therefore if we wanted to block traffic from some known idiot IP, with Network ACLs, we could just slap a deny to inbound traffic from that IP. With Security Groups, we’d have to go through and allow everything EXCEPT that IP.
Additionally, any responses to outbound traffic, such as a request that a service from within our VPC initiates, are allowed back in. For example, an instance (server) of ours makes an API call, the response from that API call is allowed back in EVEN if we do not allow traffic from that IP range.
Now this analogy needs one more addition to make it really complete. Our Security Groups are like a group of security guard employees that work for a security company.
Instead of picking individual security guards, our buildings pick a security company to guard them. The benefit is that buildings that belong to the same security company share the same set of rules.
This means we can define a set of security rules on one Security Group, and have it used on multiple servers and services. You can also tell Security Groups to allow traffic from other Security Groups, which in our analogy would be like saying, “any buildings that belong to Security Corp BRAVO can enter buildings that Belong to Security Corp ALFA”
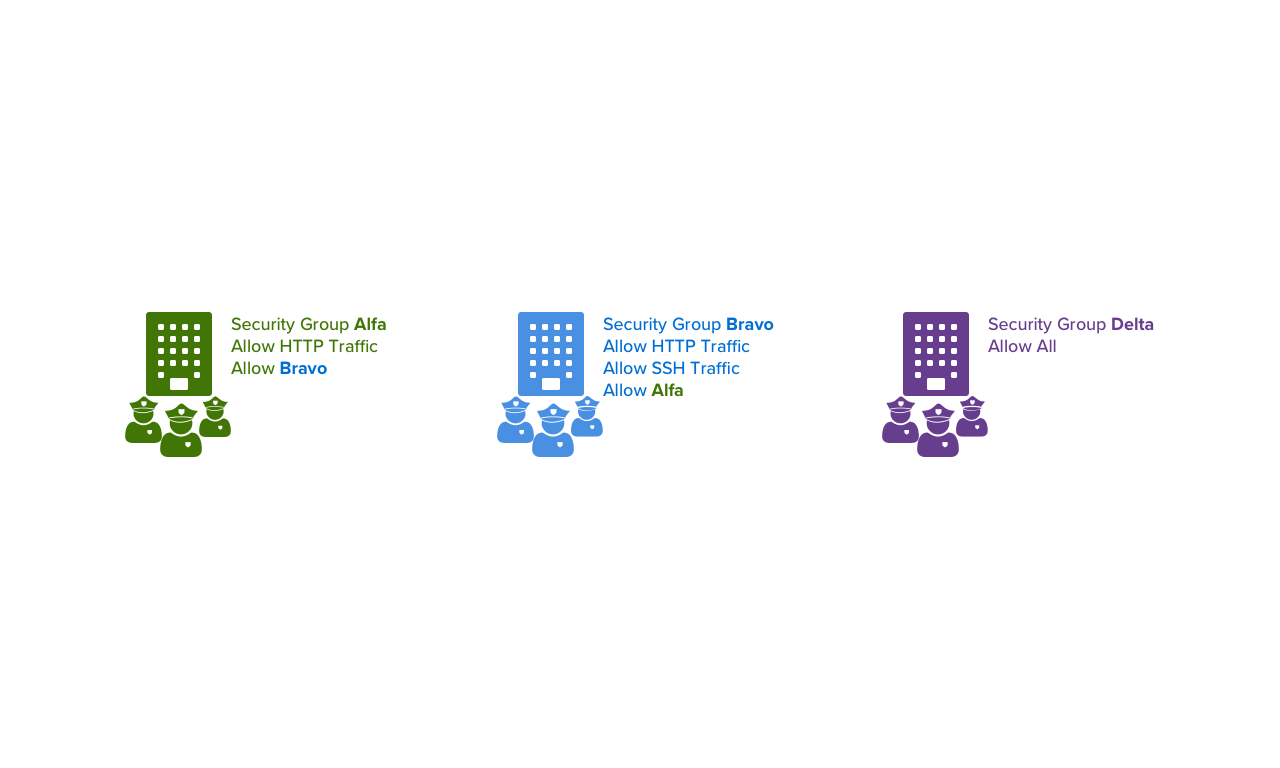
Finally, unlike ACLs and Route Tables, we can attach multiple security groups to servers / services. The resulting security is the sum of the security group rules, i.e. if one allows HTTP traffic and the other allows SSH traffic, the result is allowed traffic from both.
The How
- In the VPC console, click on Security Groups in the side bar
- Click Create Security Group
- Give it a Name Tag, Group Name and Description of your choice
Name Tag is the AWS Tag Resource that gets associated with this security group.
Group Name is the actual name of the security group.
- Specify the Inbound and Outbound Rules
Same setup as with ACLs, except:
- There’s no ALLOW/DENY
- We can specify the
Group IDof other security groups asSourcetraffic - There’s no subnet associations
- When creating Servers / Services attach the security group to them
I.e. When creating an EC2 instance there’s a section that asks for security groups to attach.
What about Availability Zones??
Right, so, that’s where the analogy kind of fails unless we get weird with it. So let’s get weird real quick.
In this dystopian, odd-ball world, we know that there’s a chance that our city, at any given time, might be destroyed. In fact, we assume that it might. THANKFULLY, though, we have the power of inter-dimensional control and know that there are parallel dimensions.
So, in order to hedge against our city being completely obliterated in the case of disaster, we create it in ALL of those parallel dimensions. Therefore if one dimension is completely wrecked… hey, we can send our inter-dimensional traffic to our city in one of the other dimensions.
Comparing to VPCs, each availability zone would be a parallel dimension. In our above example we created a series of subnets all within one availability zone. The safe and “fault tolerant” thing to do is to create that same setup in each availability zone. We’d also want to, for example, have a version of our web service in each AZ, so that if one goes down, the others are still up and able to receive traffic.
The analogy kind of gets fuzzy with the Network ACLs, Route Tables and Security Groups though, because those can be reused regardless of availability zone.
So, the steps would be:
- Continue splitting up the VPC into more subnets. Our AZs might look like:
Availability Zone: us-east-1a
-----------------------------
10.0.0.0/24 - vpcity-a-public
10.0.1.0/25 - vpcity-a-private
10.0.1.128/26 - vpcity-a-db
10.0.1.192/26 - vpcity-a-spare

Availability Zone: us-east-1b
-----------------------------
10.0.2.0/24 - vpcity-b-public
10.0.3.0/25 - vpcity-b-private
10.0.3.128/26 - vpcity-b-db
10.0.3.192/26 - vpcity-b-spare

... continue splitting into the rest of the AZs
- Launch your services/servers into that Availability Zone’s subnets as well. Basically, replicate your entire architecture into this AZ.
- Reuse ACLs, Security Groups and Route Tables where possible.
Edit (5/10/2017): Also shout out to Ken Payne, he came up with a great addition to the analogy WITHOUT resorting to SCI-FI:
You can see it in his comment below.
What about Regions??
Instead of parallel dimensions, these are alternate realities. They’re alternate, because not all the same services exist, availability zones are different and we have to recreate most of our architecture again from scratch.
By this I mean that even though we may be able to automate the replication of one infrastructure in US-East-1 into US-West-2, they’ll be using different resources, VPC, security groups, etc. (IAM is shared though!)
The VPCity Analogy All Together

The AWS Account: The Landscape
The VPC: The City (Range of Postal Codes)
The City consists of a range of postal codes.
The VPC consists of a range of IP addresses (via CIDR Block). It’s essentially a private network.
Subnets: Individual Postal Codes
The City is broken up into individual postal codes for better organization.
The VPC network is split up into multiple subnets defined by splitting the VPC IP range into smaller IP ranges (also via CIDR Block).
Route Tables: The Road Infrastructure
The Individual Postal Code’s roads (or lack of) determine if traffic can reach / exit the area.
VPC Subnets belong to a Route Table that lists the IP ranges (via CIDR again), that traffic can travel to / from.
Highway on-ramps are like Internet Gateways. One allows city traffic enter/exit outside of the city. The other allows VPC traffic to enter/exit the internet.
Connecting roads to the highway ramps are like NAT Gateways. One allows city traffic from postal codes that do not have a highway ramp to still exit/enter the city. The other allows subnets without an Internet Gateway to still access the internet.
Network ACLs: The Security Gates
Security gates sitting around an entire postal code that determines if traffic is allowed/denied entry and exit to/from the postal code.
VPC Subnets belong to a Network ACL that determines if traffic is allowed / denied entry and exit to the ENTIRE subnet. So if we’re blocked from getting into the subnet, obviously we can’t get to an instance in the subnet.
Servers/Services: The Buildings
Our city has buildings!
Our VPC has servers and services!
Security Groups: The Security Guards
Our buildings all have security guards that determine if traffic is allowed to enter or exit.
Our Servers / Services can have Security Groups that determine if traffic is allowed to enter or exit.
The differences from Network ACLs (aside from not being at the subnet level):
a) They cannot specify explicit DENY traffic
b) They allow external responses to requests from within their protected server / service
c) Servers / services can have multiple Security Groups
d) Security Groups can reference each other as a source of traffic
Availability Zones: Parallel Dimensions
A number of parallel dimensions exist in our world. We rebuild our city in each of those dimensions. If one goes to flames, we can send our inter-dimensional traffic to a different one.
Our VPC can connect to other Availability Zones (AZs). Continue segmenting the VPC IP range into subnets and create the same setup in each AZ. Make the same services available in each AZ as well. Reuse Network ACLs, Security Groups and Route Tables where appropriate. This way if one AZ goes down, our traffic can go to the setup in another one.
Regions: Alternate Realities
A whole new existence with a whole new set of parallel dimensions.
Although you can reuse some things in between regions (like IAM), for the most part, you’ll rebuild everything. Even if that means using something like CloudFormation or an automation script.
Final Thoughts
Let’s be clear here - this covered the core concepts and enough knowledge to be dangerous… but there is indeed a LOT more. The better understanding that you have of networking and all things sysadmin, the easier it will be to dip into AWS VPCs without drowning. Additionally, the more of AWS in general that you understand, the easier it will be to make proper use of VPCs.
The next step, if you’d like to continue spelunking into the VPCave, is to begin making your own. Deep dive the docs. Be purposeful with your app needs. Find other people who have shared similar problems and learn from their experiences (if they’re understandable).