Audio manipulation with ffmpeg
Audio manipulation
In this chapter, we’ll be going to check out some audio manipulation techniques with FFmpeg!
First of all, let’s see our example file:
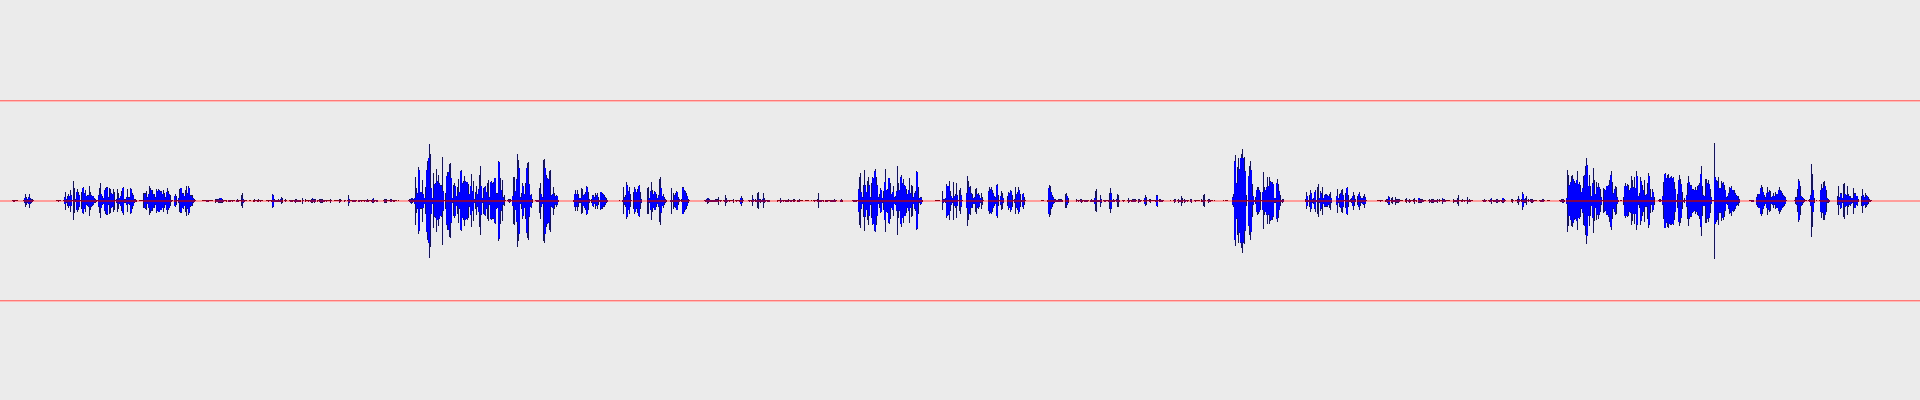
It is a voice recording, and it is intentionally… well, quite bad.
From the waveform, it is obvious that there are very different volume ranges in it. This is an example recording where each sentence was read in different strengths: “normal”, “whisper” or “powerful”, this is why you see repeating patterns of amplitude ranges on the image.
It isn’t visible, but it has some noise too, and of course, it is not normalized or enhanced in any way. Yet.
Please note that there are different scenarios, requirements, and ways to enhance audio. This is a simplified method to show the outline of the process in this article. I’m not an audio engineer, although I have some experience in the area. So if you know it better, feel free to fine-tune it for yourself even more, or contact me and recommend improvements!
I’m showing an example here with a very rough input, one that you’d just reject in real life as it would be useless due to its quality. But it is an excellent example to show the different steps of the enhancing process and to see what can be done to it!
The following steps are built upon each other, and we’ll reach the complete command at the end!
Don’t forget that these settings are specific to this voice recording. Sadly this can not be generalized too much.
Gate
Let’s start with the gate filter!
A gate is like a switch that opens only if the signal is stronger than the threshold. So if the signal level is lower than the threshold, it cuts to complete silence. Although you might soften or delay this cut with the knee, attack, and release arguments.
We’ll use this filter as a basic noise reduction method now! This helps us remove the noise between words and sentences by cutting it to silence. It doesn’t remove noise in any other way, e.g. it doesn’t touch the static on the voice itself.
Check this out!
ffmpeg -y \
-i voice_recording.wav \
-filter_complex "agate=threshold=0.01:attack=80:release=840:makeup=1:ratio=3:knee=8" \
gate.wav
Let’s hear it: gate.wav
And let’s see it:
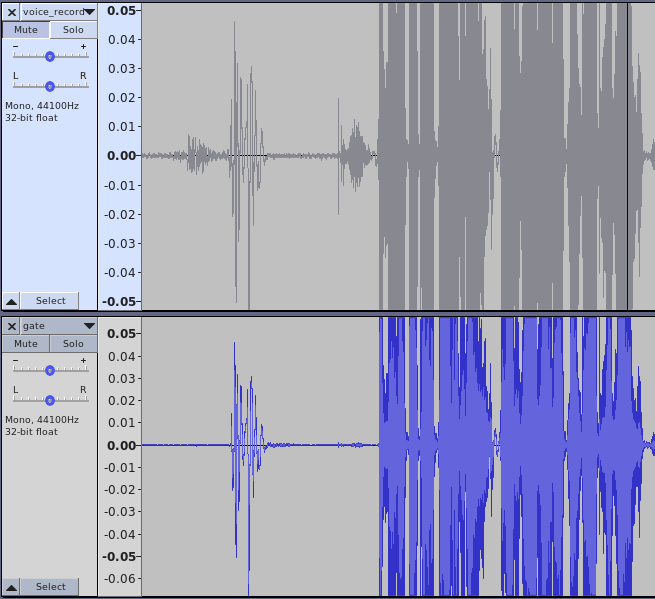
As you can see, the “silent” parts were attenuated heavily, while the above-the-threshold parts remained similar. Those parts were still affected by the knee, attack, and release arguments determining how hard (knee) and quick (attack/release) the cut is.
I’ve left a quite high release timeout here to avoid sudden dips in the amplitude.
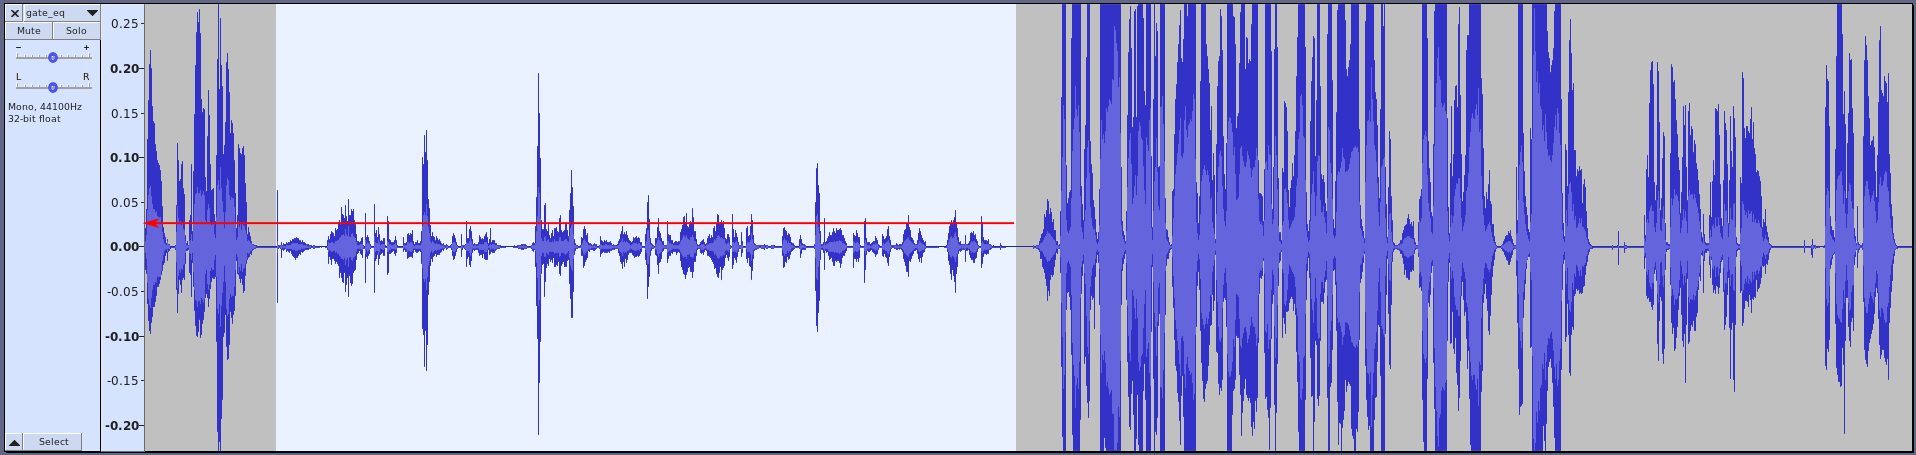
This is where we are right now:

The silent parts are more silent than before, but still, the amplitude range or the dynamic range is quite high. You must change your volume levels to hear everything and void blowing your speakers/brain out.
Equalization
Before fixing that, let’s do a bit more housekeeping. Let’s do some equalization and frequency filtering!
We’ll use these filters:
ffmpeg -y \
-i gate.wav  \
-filter_complex "highpass=f=100:width_type=q:width=0.5 , lowpass=f=10000 , anequalizer=c0 f=250 w=100 g=2 t=1|c0 f=700 w=500 g=-5 t=1|c0 f=2000 w=1000 g=2 t=1" \
gate_eq.wav
Let’s hear it: gate_eq.wav
This command gradually attenuates frequencies below 100hz, as there are not much valuable content in there, but it can really lower the clarity of the speech.
Then we do the same, but for frequencies above 10 kHz. This is mostly needed because we have a lot of high-frequency noise, so this is a workaround for those. Also, a male voice is generally deeper than a woman’s, so you might want to pay attention to how low you can put the bar.
Then comes anequalizer, which has a crazy an exceptional way of setting its arguments:
This: anequalizer=c0 f=250 w=100 g=2 t=1|c0 f=700 w=500 g=-5 t=1|c0 f=2000 w=1000 g=2 t=1 means:
- at 250hz with a width of 100hz boost by 2 db, with Chebyshev type 1 filter on channel 0.
- at 700hz with a width of 500hz attenuate by 5 db, with Chebyshev type 1 filter on channel 0.
- at 2000hz with a width of 1000hz attenuate by 2 db, with Chebyshev type 1 filter on channel 0.
I agree. You might have used a friendlier equalizer in your life than this one:)
Those values are based on experimentation and common recommendations for voice. Feel free to tune it for your own needs!
Let’s compare the frequency plots before and after:
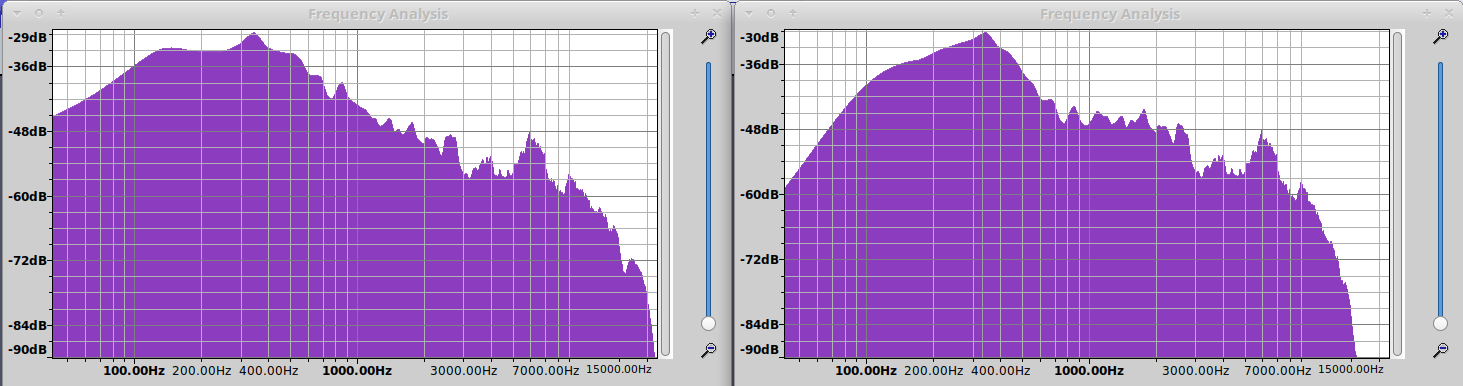
Tip: To see the frequency plot in Audacity, open a file, select all, and choose Analyze → Plot spectrum!
Compression
The compressor filter applies dynamic range compression on the incoming audio data. To simplify this, the compressor varies the attenuation based on the incoming signal level. Basically, when you watch a badly mastered movie, this is what you are doing. When it is way too loud in some action scene, you reach for the remote control or mouse to lower the volume, but in the next moment, you will not hear what your heroes are saying, so you increase it back again.
Dynamic range compression roughly does the same. You may set it up in a way so that it would attenuate louder parts, therefore keeping the overall volume range relatively small.
It often happens that performers on the stage use a high dynamic range. Many performers will shout at one moment and then whisper in the next to increase drama or keep the attention. If you want to avoid manually adjusting the volume in real-time (while blowing off your speakers and pulling your hair out), then a compressor will save you in these situations!
This is why our example audio consists of different speaking strengths, so that we could see the dramatic effect of this filter.
ffmpeg -y \
-i gate_eq.wav \
-filter_complex "acompressor=level_in=6:threshold=0.025:ratio=20:makeup=6" \
gate_eq_comp.wav
Let’s hear it: gate_eq_comp.wav
And let’s compare the result of this with the original waveform!
Original:

Result:
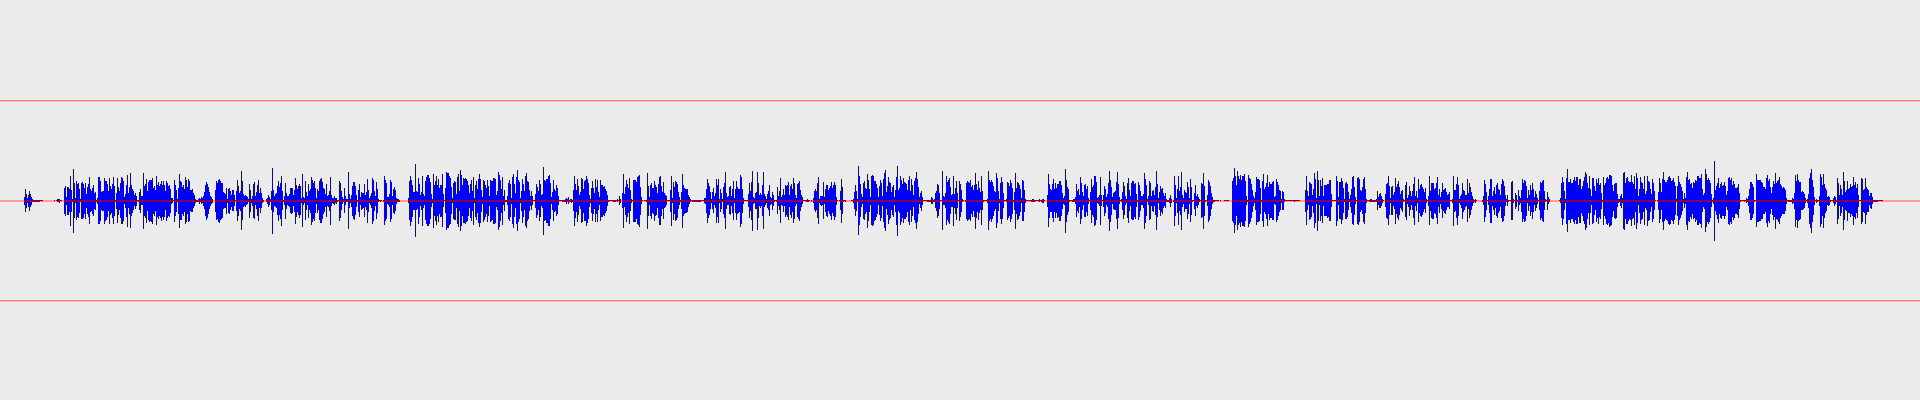
Quite dramatic, isn’t it?:)
Let’s analyze this: acompressor=level_in=6:threshold=0.025:ratio=20:makeup=6
First, level_in=6 sets the input gain. It is 1 by default, but since our example, audio is extremely silent at places, we boost up the whole thing before processing.
Then threshold=0.025 defines that everything above 0.025 should be attenuated.
Based on the image below, I’ve decided to cut at this point, as this is above most of the whispering, which cuts hard pops and “s”-es even in the “whisper zone”.
Then ratio=20 means 1:20 in attenuation ratio, which means that if the level rises 20 dB above the threshold, it will be only 1 dB above the line after the attenuation. Basically, this is a very strong compression ratio, it is almost a limiter.
This far, we boosted the signal, then turned down everything that was above our “whisper line” with a quite strong ratio, and now, everything is basically at the whisper level, even the parts that are shouting.
Finally, with the makeup=6 we just bring back everything to the level where the “normal” parts were before.
Let’s take a look back now, to understand why we used the gate and did the equalization before the compressor.
Generally, you want to remove unneeded parts and frequencies before compression, as the compressor will likely increase those too! So by removing most of the noise in the gaps, we avoided level_in=6 to increase them too! And the same goes for the high- and lowpass filtering.
Changing the volume
Now, if we want to make the result a bit louder, we could increase the previous step’s makeup argument, or leverage the volume filter.
While we are at it, let’s cut the first 4 seconds too with -ss 4.
ffmpeg -y \
-ss 4 -i gate_eq_comp.wav \
-filter_complex "volume=1.1" \
gate_eq_volume_comp.wav
Let’s hear it: gate_eq_volume_comp.wav
Let’s make audio gate again
Excuse me for that title:)
So as I’ve described earlier, compression can amplify the noises, so you might want to run the result through a gate again:
ffmpeg -y \
-i gate_eq_volume_comp.wav \
-filter_complex "agate=threshold=0.1:attack=50:release=50:ratio=1.5:knee=4" \
gate_eq_volume_comp_gate.wav
Let’s hear it: gate_eq_volume_comp_gate.wav
In this case, I’ve used a softer gate, with ratio=1.5. Because of this, I could use shorter attack and release delays too, as the attenuation is not that strong, it isn’t causing hard dips in the audio.
Putting it all together
Just a single command could have achieved all the steps above:
ffmpeg -y \
-i voice_recording.wav \
-filter_complex "agate=threshold=0.01:attack=80:release=840:makeup=1:ratio=3:knee=8 , highpass=f=100:width_type=q:width=0.5 , lowpass=f=10000 , anequalizer=c0 f=250 w=100 g=2 t=1|c0 f=700 w=500 g=-5 t=1|c0 f=2000 w=1000 g=2 t=1 , acompressor=level_in=6:threshold=0.025:ratio=20:makeup=6 , volume=1.1 , agate=threshold=0.1:attack=50:release=50:ratio=1.5:knee=4" \
gate_eq_volume_comp_gate_together.wav
I just copy-pasted all the filters right after each other with a comma between them.
Isn’t it beautiful? Yeah, it isn’t, but it is very practical:)
For the last time, check out the difference:
- Original: voice_recording.wav
- Final: gate_eq_volume_comp_gate.wav
It has less noise, more clear voice, and a small volume range. Therefore it is easy on your ears!
What else?
You might want to check out a few more filters that I didn’t cover here.
Here are just a few interesting ones: