Basic editing with ffmpeg
Basic editing with FFmpeg
In this section, we’ll achieve basic editing tasks by using FFmpeg only!
We’ll just get a basic mp4 with default settings in these examples to keep things simple. But to encode the result in a proper, high quality way, please check the earlier sections where we learned how to encode into H.264 and H.265!
Trimming from the beginning of the clip
It is possible to specify an in-point for a media file. By doing that, you essentially cut off the specified amount from the beginning of the input file. Therefore, FFmpeg will skip the first part of the file and only transcode the remainder!
For this, you need the “-ss” flag! The value can be specified in seconds (5 or 5.2) or as a timestamp (HOURS:MM:SS.MILLISECONDS).
To get the outro only, we could seek all the way to the end of the video! (It is 00:10:34.53 or 635 seconds long!)
# Get
# 635 - 4 = 631
ffmpeg -y -ss 631 -i bbb_sunflower_1080p_60fps_normal.mp4 last_4_seconds.mp4


# 00:10:34.53 - 4 = 00:10:30.53
ffmpeg -y -ss 00:10:30.53 -i bbb_sunflower_1080p_60fps_normal.mp4 last_4_seconds.mp4
Seeking can be a bit tricky, so you may want to learn more about seeking here.
Trimming from the end of the clip
You can also set an out-point for an input file, therefore shortening it. There are two options for this:
- -t: This sets the duration.
- -to: This sets the timestamp where the input video should stop.
These two are mutually exclusive, and also they do the same if no -ss is specified. The value can be specified in seconds (5 or 5.2) or as a timestamp (HOURS:MM:SS.MILLISECONDS).
Let’s experiment with them!
# "Get 30 seconds of the input."
ffmpeg -y -t 30 -i bbb_sunflower_1080p_60fps_normal.mp4 first_30_seconds.mp4
ffmpeg -y -t 00:00:30.0 -i bbb_sunflower_1080p_60fps_normal.mp4 first_30_seconds.mp4

# "Get everything until the content's 30th second."
ffmpeg -y -to 30 -i bbb_sunflower_1080p_60fps_normal.mp4 first_30_seconds.mp4
ffmpeg -y -to 00:00:30.0 -i bbb_sunflower_1080p_60fps_normal.mp4 first_30_seconds.mp4
All four above commands result in exactly the same video. (For nerds: even the md5sum is the same.)
But let’s see how they perform when we introduce seeking!
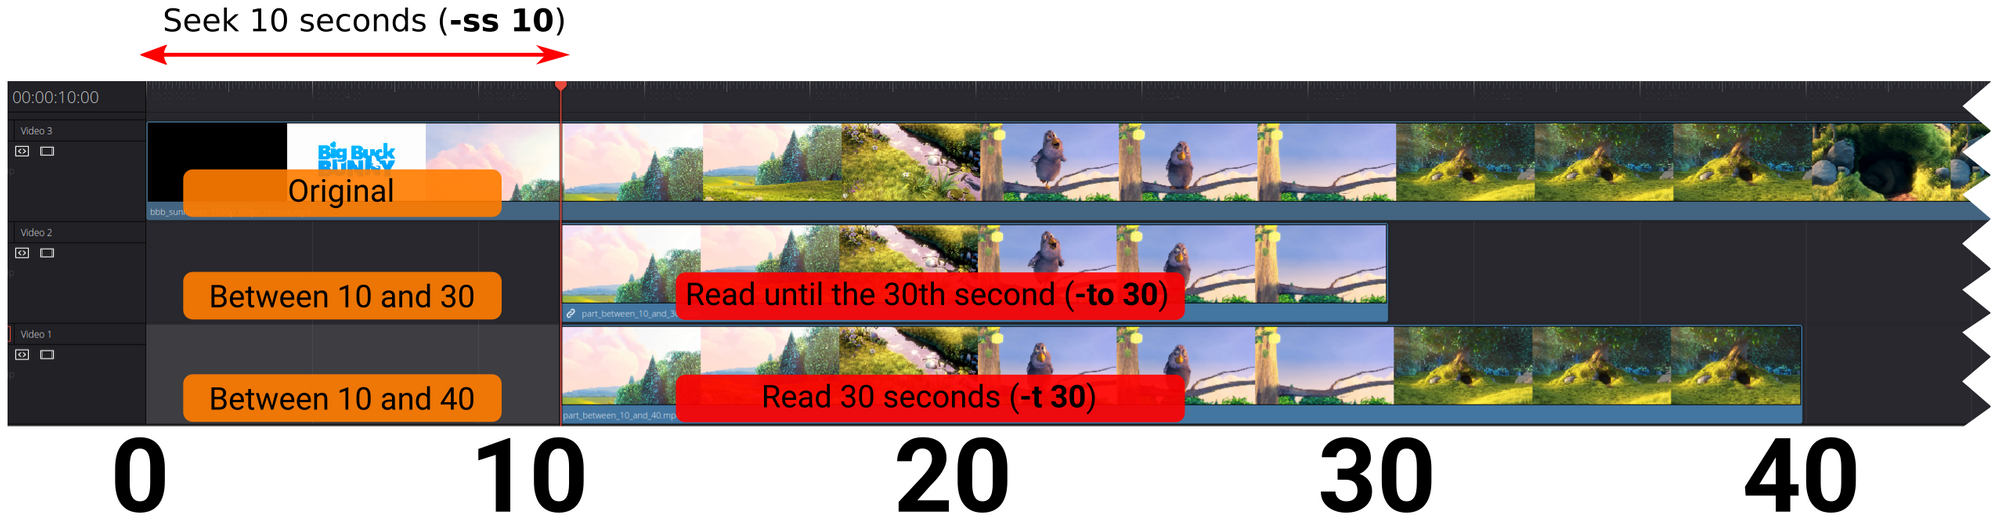
# "Seek to the 10th second and get me 30 seconds of the input."
ffmpeg -y -ss 10 -t 30 -i bbb_sunflower_1080p_60fps_normal.mp4 part_between_10_and_40.mp4

# "Seek to the 10th second and get the content until the 30th second."
ffmpeg -y -ss 10 -to 30 -i bbb_sunflower_1080p_60fps_normal.mp4 part_between_10_and_30.mp4
The first command will result in a 30 second long video, while the second command will be 20 seconds long only!
The figure below shows the difference:
Editing without reencoding
FFmpeg can do something I’m not aware of in any other popular NLE: it can edit videos without reencoding them!
The usual workflow is to decode the data frames (a/v) into memory, modify them as much as we like and then encode them into a new video file. The problem with this is that unless you work with raw or lossless codecs, you’ll lose some quality in the process. Another issue with this approach is that it is computationally intensive.
For certain operations, you can configure FFmpeg, to keep the data frames intact, and this way, you can avoid decoding and encoding them! This is incredibly faster than regular transcoding, usually hundreds of times faster.
The “certain operations” are those that don’t need to modify the data frames themselves. For example, you can cut and trim this way. Also, you can manipulate streams while keeping others, like you can replace the audio track without touching the video frames.
All this is a bit of magic, and there are caveats you need to prepare for, but it is good if you know about this, as it is often handy!
The trick lies in two options:
- -c:v copy: The “copy” video codec
- -c:a copy: The “copy” audio codec
Let’s see a few examples!
Remove audio while keeping the video without reencoding
ffmpeg -i bbb_sunflower_1080p_60fps_normal.mp4 -c:v copy -an copied_video_only.mp4Here, we used the “-an” option, which removes all audio streams. I remembered it as “audio no”, but that is just my mnemonic:)
Let’s see how fast it was:
frame=38072 fps=20950 q=-1.0 Lsize= 310340kB time=00:10:34.51 bitrate=4006.7kbits/s speed= 349xSo It processed the whole 10 minutes of video in 2 seconds, 349x faster than playback, with 20950 fps!
Remove video while keeping the audio without reencoding
ffmpeg -i bbb_sunflower_1080p_60fps_normal.mp4 -c:a copy -vn copied_audio_only.wavHere, we used the “-vn” option, which removes all video streams. I remembered it as “video no”.
Let’s see how fast it was:
size= 24772kB time=00:10:34.14 bitrate= 320.0kbits/s speed= 776x 776x faster than playback, finished in about a second, not bad!
Cut and trim without reencoding
ffmpeg -ss 10 -t 10 -i bbb_sunflower_1080p_60fps_normal.mp4 -c:a copy -c:v copy part_from_10_to_20_copied.mp4There could be precision issues with seeking while you do this, so you may want to learn more about seeking and copying here.
Replace audio on video file without reencoding
We have removed audio and video already, but what if we want to swap them?
ffmpeg -y \
-i bbb_sunflower_1080p_60fps_normal.mp4 \
-i voice_recording.wav \
-map "0:v" -map "1:a" \
-c:v copy -c:a copy \
bbb_with_replaced_audio.mov
There is quite a lot going on in here, so let’s explain the parts!
First, we have two inputs (-i), meaning we are better off manually specifying the mapping. The command would work without the “-map” options, but it would ignore our second input.
-map "0:v" -map "1:a" means that please use the first file’s (first) video stream and the second file’s (first) audio stream.
With -c:v copy -c:a copy, we require FFmpeg to copy the already encoded data packets without touching them. Therefore FFmpeg’s work is mostly really just copying bytes, no decoding, no encoding.
Not surprisingly, that’s what we see in the stream mapping too:
Stream mapping:
  Stream #0:0 -> #0:0 (copy)
  Stream #1:0 -> #0:1 (copy)
Press [q] to stop, [?] for help
frame=38072 fps=9750 q=-1.0 Lsize=  320645kB time=00:10:34.51 bitrate=4139.7kbits/s speed= 162x
And since it is just copying, it was crazy fast, 162x of the playback speed, or almost 10k frames per second!
But!
Execute the exact same command, but with “bbb_with_replaced_audio.mp4” (.mp4 container instead of .mov) as an output file! You’ll get this:
Could not find tag for codec pcm_s16le in stream #1, codec not currently supported in containerThe message is quite clear. You can not have a pcm_s16le (raw WAV, say that 10 times:)) stream in an MP4 container. I’m not sure if it is FFmpeg’s or the container’s lack of support, but we need to solve this. If you run into this situation, you might consider two solutions:
- Change the container: I’ve just tried MOV, and it worked.
- Encode the audio: We still copy the video data, and encoding audio isn’t that painful.
I just showed you option #1, so let’s see option #2:
ffmpeg -y \
-i bbb_sunflower_1080p_60fps_normal.mp4 \
-i voice_recording.wav \
-map "0:v" -map "1:a" \
-c:v copy \
-c:a aac -b:a 320k -ar 44100 \
bbb_with_replaced_audio_aac.mp4
This copies the video frames and encodes our WAV into a supported codec to be held in the mp4 container. You can refer back to the audio encoding section if you want to learn more about that.
Here is the output:
Stream mapping:
  Stream #0:0 -> #0:0 (copy)
  Stream #1:0 -> #0:1 (pcm_s16le (native) -> aac (native))
Press [q] to stop, [?] for help
...
frame=38072 fps=2176 q=-1.0 Lsize=  313058kB time=00:10:34.51 bitrate=4041.8kbits/s speed=36.3x
“Only” 36x faster than playback, 2176 fps, still not that bad!