ffmpeg CLI
FFmpeg’s command line system
For those who are just joining in: please get the example assets if you want to test out the commands shown in this chapter!
FFmpeg CLI
Finally, we arrived at FFmpeg, and trust me, we’ll execute it quite a lot of times! Let’s see how FFmpeg’s command line options are organized, as that is the first tricky part we need to understand!
FFmpeg mostly thinks about input and output files and their options together with global options. You specify input files with the “-i” flag followed by a file name. For the output file, specify it as-is without any preceding CLI (command line interface) flag.
Specifying an input file
Let’s specify just an input file:
ffmpeg -i bbb_sunflower_1080p_60fps_normal.mp4 The following image helps to understand the output:
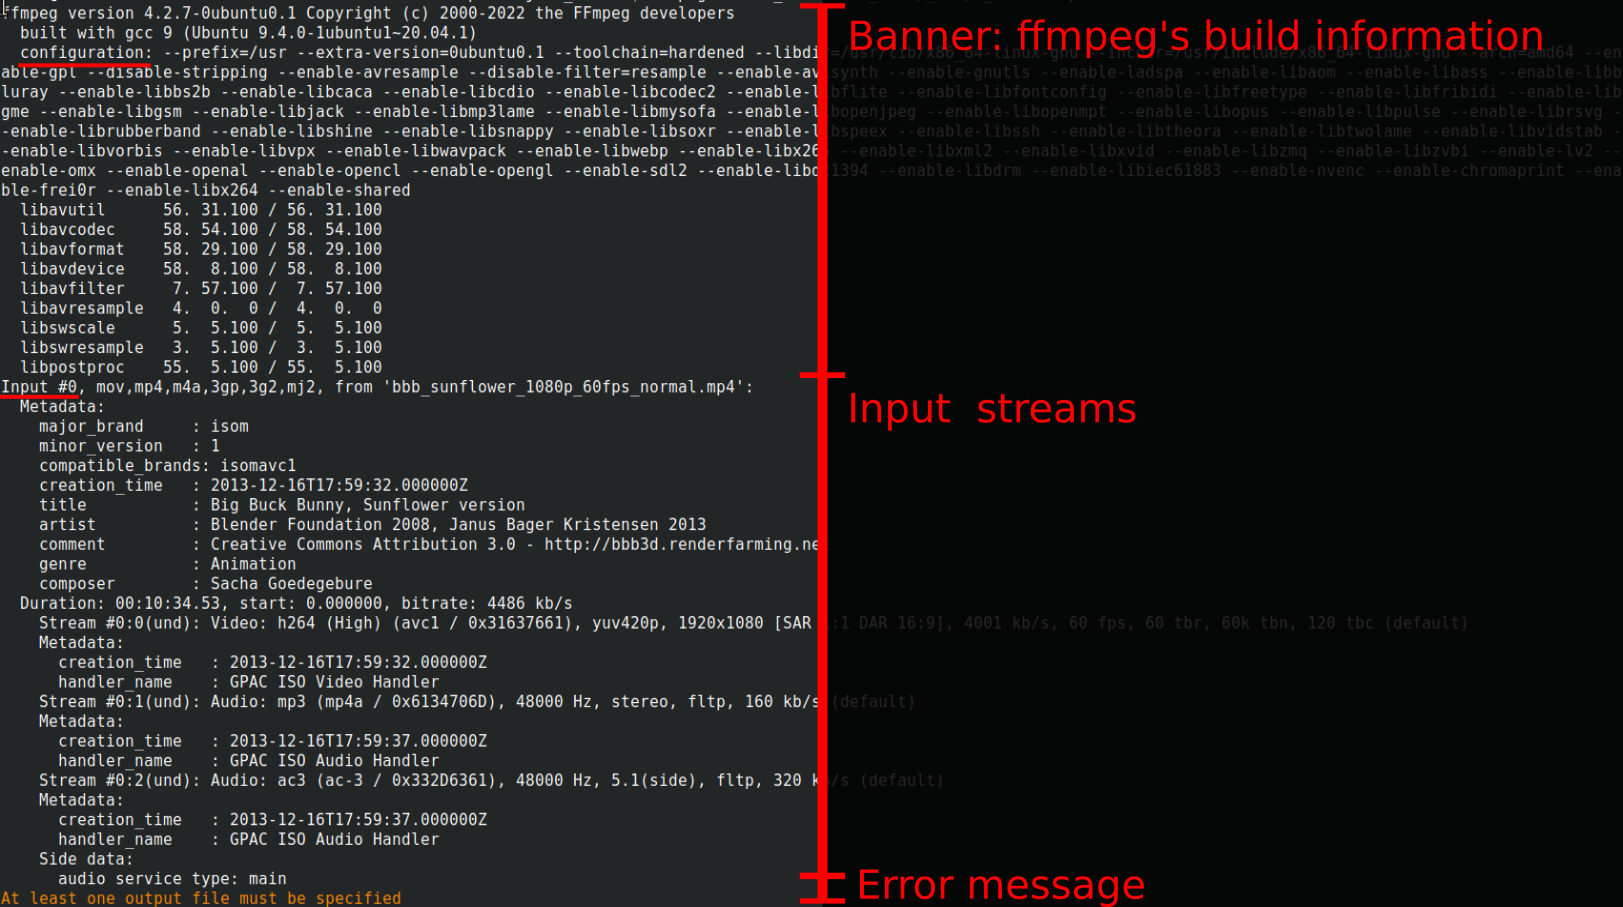
- First, you get the “banner”, where you see the build information and lib versions. If you watch closely, you’ll see the compilation flags, starting with —, e.g. —enable-shared.
- Then you get the same output as we have seen with ffprobe earlier.
- And then you get a complaint that there is no output file(s) specified. That’s fine for now.
You can remove the banner here with “-hide_banner”, but for brevity’s sake I’ll not include that anymore in the commands here, and I will leave it out from the outputs too.
Now, let’s get brave, and specify an output file!
Specifying an output
As I’ve said earlier, the output file is understood by FFmpeg as it is just a filename. But more specifically, it is after the input(s) specifications, and it is not a value of any other switches.
Don’t be confused for now, but yes, FFmpeg can have as many inputs and outputs as you’d like. We’ll cover that in more detail soon!
This command line specifies a single output file:
ffmpeg -i bbb_sunflower_1080p_60fps_normal.mp4 audio_only.wavBefore taking a look at the output, let me congratulate you! You have just converted a video file into an audio file, by keeping just the audio content!
This is how you transcode! Of course, you’ll want to specify more parameters later on.
So, here is the output:
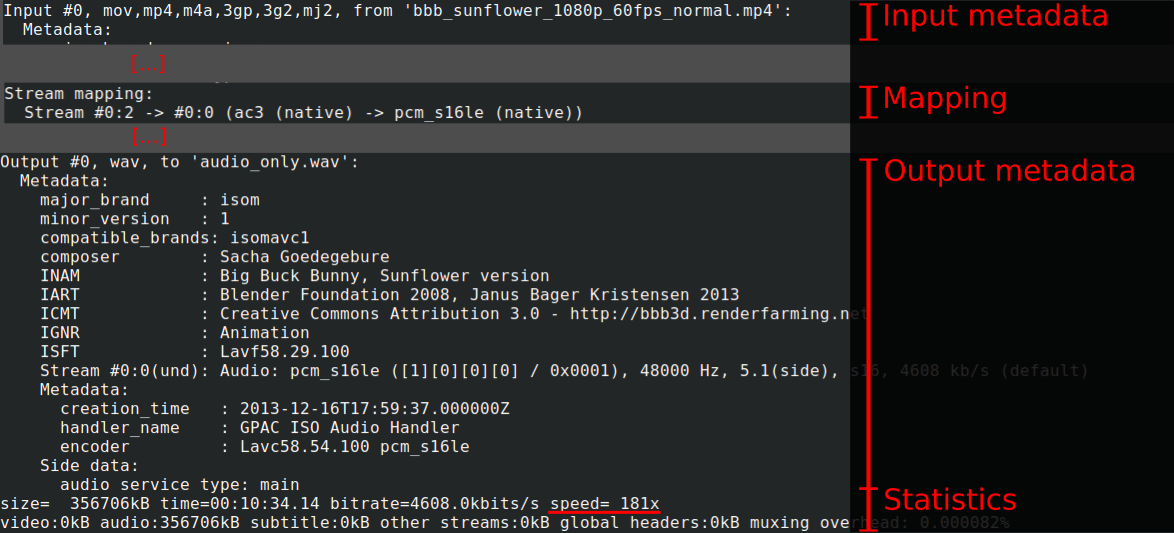
Let’s analyze it!
(1) First, we have our input metadata printing, which we saw many times already.
(2) Then we have something called “stream mapping”. We forced FFmpeg into a decision situation, as we specified an input file with 1 video and 2 audio streams. We said we wanted an audio output (guessed from the .wav extension). But we didn’t specify which audio stream we wanted, so let’s see what FFmpeg decided:
- “Stream #0:2” means “The first input file’s third stream” or “input file index 0’s stream with index 2.” This is the input.
- ”→ #0:0” means the first output file’s first stream. This is the output.
- Here you can learn more about how FFmpeg decide this.
- Later on, we’ll manually override the mapping.
- Summary: FFmpeg decided to convert the third stream in the input file (the ac3 5.1 audio) into the first stream of the output file.
(3) Then we have our output metadata information. This reveals what FFmpeg will output. It usually copies most of the metadata, and here you also see the container/format information too.
(4) And then we see the output summary. For example, the transcoding was 181x faster than the playback speed. Nice!
Understanding the command line order
Before going further, let’s understand FFmpeg’s command line arguments from a bird’s eye view!
In the manual, you’ll see this:
ffmpeg [global_options] {[input_file_options] -i input_url} ... {[output_file_options] output_url} ...(Parts in […] are meant to be optional, and parts in {…} are meant to be specified 1 or more times.)
This is the general outline of how to specify inputs, outputs, input options, output options, and global options. The order matters, but it is easy to remember: global options, inputs and outputs. Also, i/o options come BEFORE the i/o specification.
Let’s put these into pseudo command line options, to understand it better:
# One inputs, one output, nothing fancy
ffmpeg -i input1.mp4 output1.wav

# Two inputs, one output
ffmpeg -i input1.mp4 -i input2.mp4 output1.wav

# Two inputs, two outputs
ffmpeg -i input1.mp4 -i input2.mp4 output1.wav output2.mp3

# One input, one output, with options
ffmpeg [input1 options] -i input1.mp4 [output2 options] output1.wav

# Two inputs, two outputs with options
ffmpeg [input1 options] -i input1.mp4 \
       [input2 options] -i input2.mp4 \
       [output1 options] output1.wav \
       [output2 options] output2.mp3
As for the global options, these are the ones you might care about:
- -hide_banner: To skip printing the banner.
- -y: To overwrite the output even if it exists.
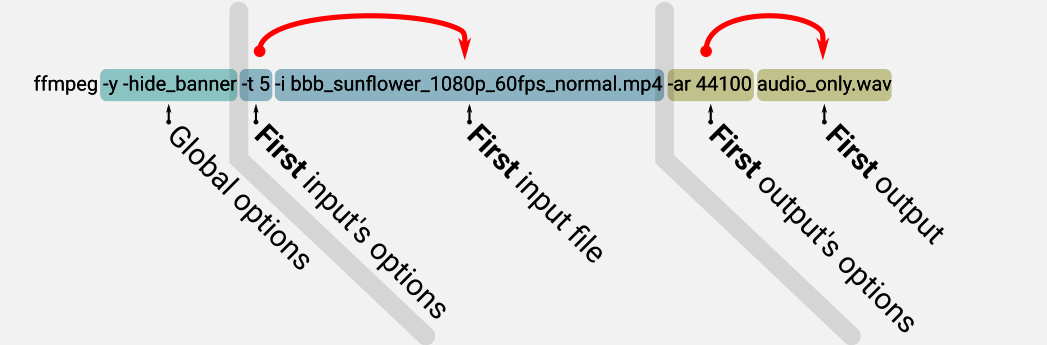
For example, you can run this as many times as you want:
ffmpeg -y -hide_banner -i bbb_sunflower_1080p_60fps_normal.mp4 audio_only.wavAnd it will overwrite the output and be less verbose than earlier.
Without explaining the options themselves, let’s just see some real-world examples with options:
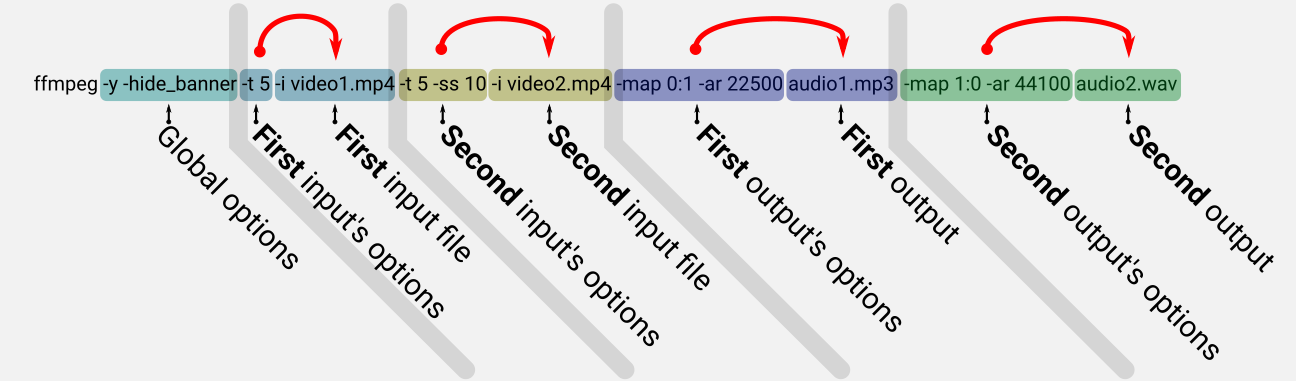
And here it is with two inputs and two outputs:
Mapping files
We saw above that this command:
ffmpeg -i bbb_sunflower_1080p_60fps_normal.mp4 audio_only.wav… will result in an audio file that contains one of the audio streams from the input video chosen by FFmpeg. This automatic stream selection is usually handy when it is trivial. For example, when you have one stream as input and one output file, you don’t need to specify any mapping manually.
But in cases where it is not so trivial, you are usually better off manually specifying what you really want to do.
The following image summarises what our current situation is:
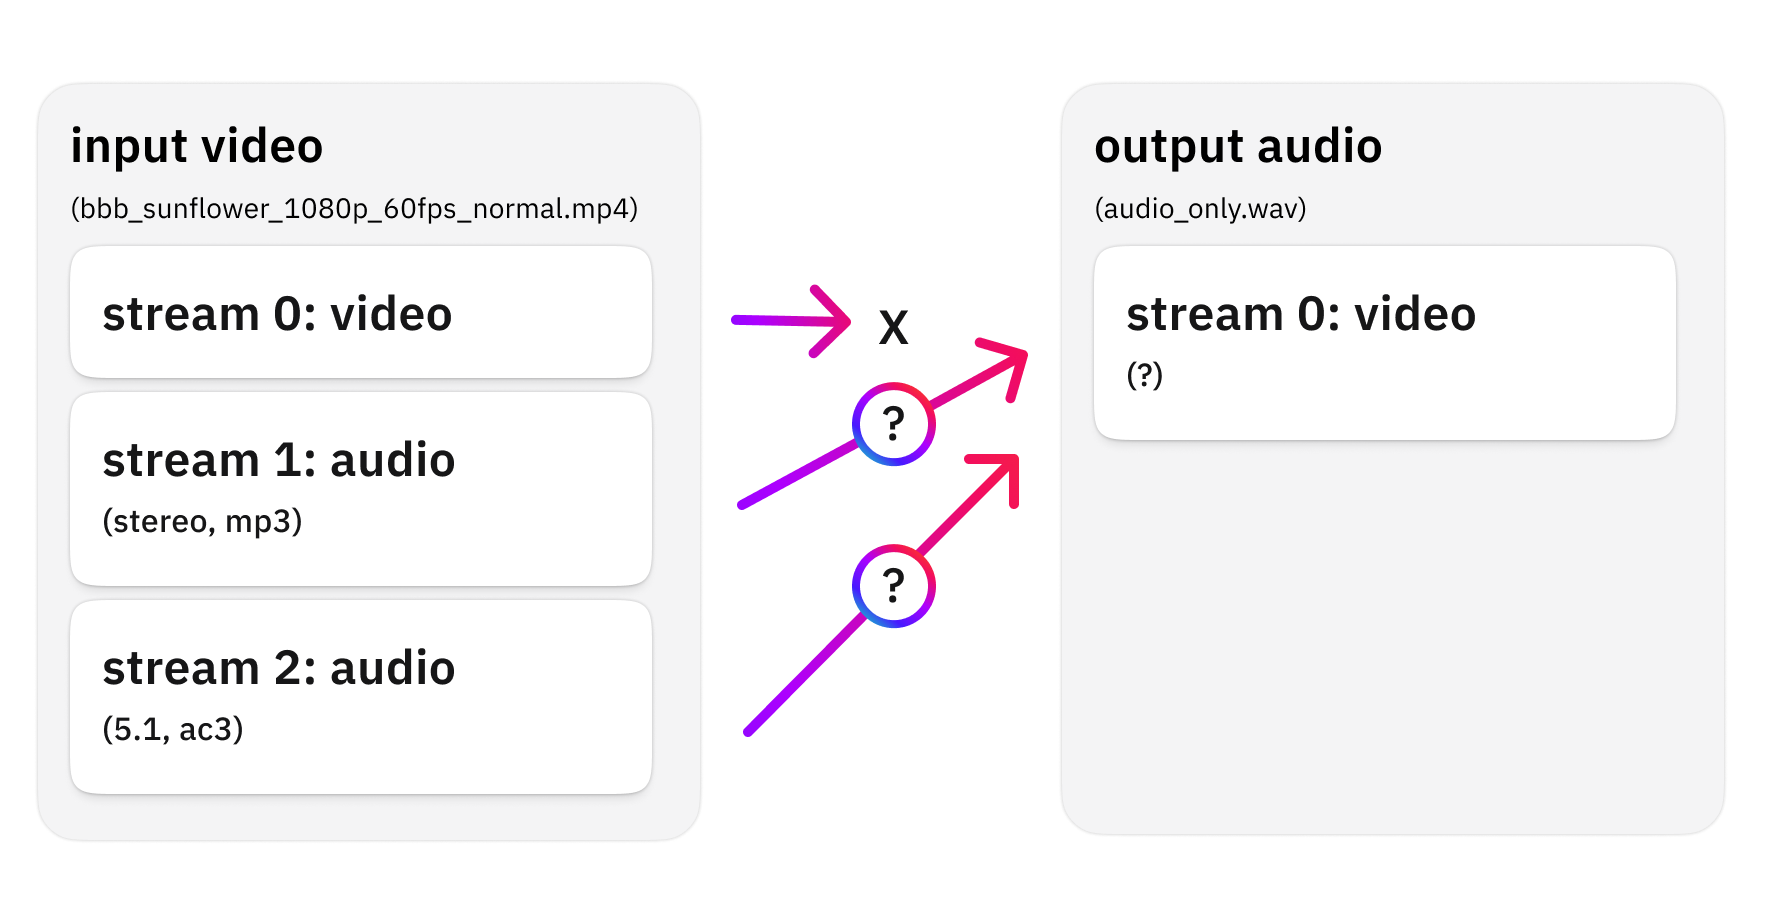
The video stream was not matched, as the output format was an audio file (.wav). But then FFmpeg chose Stream #2, because it has more channels.
So what if we’d like to get the stereo track instead? That is where mapping comes in! The mapping is a parameter of the OUTPUT file. Therefore the mapping arguments should come right before our output file definition!
ffmpeg -i bbb_sunflower_1080p_60fps_normal.mp4 -map 0:1 stereo_audio_only.wavThe argument -map 0:1 means, that in the output (since we specify it as an output option) we’d like to have Input #0’s (the first input file) Stream #1!
Let’s see the relevant parts from the output!
Input #0, mov,mp4,m4a,3gp,3g2,mj2, from 'bbb_sunflower_1080p_60fps_normal.mp4':

[...]

Stream mapping:
  Stream #0:1 -> #0:0 (mp3 (mp3float) -> pcm_s16le (native))

[...]

Output #0, wav, to 'stereo_audio_only.wav':
  Metadata:
[...]
    Stream #0:0(und): [...] stereo [...]
The “Stream #0:1 → #0:0” part means that we have successfully overridden the mapping, to get the mp3 stream (0:1) into our output! Also, the output metadata reveals that we’ll get a stereo result instead of the 5.1 earlier.
Multiple outputs
You can have multiple outputs from a single input, let’s see when that might be useful!
Let’s say, we want to extract BOTH audio streams into two separate WAV files! It is super easy:
ffmpeg -y -i bbb_sunflower_1080p_60fps_normal.mp4 -map 0:1 stereo_audio_only.wav -map 0:2 ac3_audio_only.wavSee? I have just specified two output files with two mapping specifications! Also, I have sneaked in the “-y” to have it overwrite our previous file!
Let’s check out the relevant parts of the output!
Input #0, mov,mp4,m4a,3gp,3g2,mj2, from 'bbb_sunflower_1080p_60fps_normal.mp4':

[...]

Stream mapping:
  Stream #0:1 -> #0:0 (mp3 (mp3float) -> pcm_s16le (native))
  Stream #0:2 -> #1:0 (ac3 (native) -> pcm_s16le (native))

[...]

Output #0, wav, to 'stereo_audio_only.wav':
    Stream #0:0(und): [...] stereo

[...]

Output #1, wav, to 'ac3_audio_only.wav':
    Stream #1:0(und): Audio: [...] 5.1(side)
Now the mapping reveals two lines, as we have two outputs! And indeed, you’ll get two .wav files as the output, one is stereo, and one is 5.1!
There might be several other reasons why you’d want to get multiple outputs. Let’s briefly check out a few!
Different formats:
ffmpeg -y -i bbb_sunflower_1080p_60fps_normal.mp4 stereo_audio_only.wav stereo_audio_only.mp3 Wow, did you catch that? We just created a WAV and an mp3 in a single command line! I’ve reverted to the automatic stream selection for brevity’s sake.
A bit closer to real-life needs, you might want different output qualities:
ffmpeg -y  -i bbb_sunflower_1080p_60fps_normal.mp4  \
-map 0:1 -b:a 320k stereo_audio_only_high_quality.mp3 \
-map 0:1 -b:a 64k  stereo_audio_only_low_quality.mp3
Here -b:a 320k means “bitrate of audio should be around 320 kbit/sec”. So I have requested FFmpeg to make two mp3s for me, from the stereo stream of the input.
Checking on the files, this is what we got:
 25Mb stereo_audio_only_high_quality.mp3
4,9Mb stereo_audio_only_low_quality.mp3
One more common reason for having multiple outputs or using mapping is when we introduce filters into our pipeline, but that will be discussed later!
Now you understand the foundations of how to communicate your basic requirements to FFmpeg via its command line! Great job! Now we can dive even deepert.