docker security best practices
src: Docker security best practices - 2021-07-30
Abstract
List of best practices when writing Dockerfiles.
Docker containers have been an essential part of the developer’s toolbox for several years now, allowing them to build, distribute and deploy their applications in a standardized way.
This gain in traction has been, not surprisingly, accompanied by a surge in security issues related to containerization technology. Indeed, containers also represent a standardized surface for attackers. They can easily exploit misconfigurations and escape from within containers to the host machine.
Furthermore, the word “container” is often misunderstood, as many developers tend to associate the concept of isolation with a false sense of security, believing that this technology is inherently safe.
The key here is that containers don’t have any security dimension by default. Their security completely depends on:
- the supporting infrastructure (OS and platform)
- their embedded software components
- their runtime configuration
Container security represents a broad topic, but the good news is that many best practices are low-hanging fruits one can harvest to quickly reduce the attack surface of their deployments.
That’s why we curated a set of the best recommendations regarding Docker containers configuration at build and runtime. Check out the one-page cheat sheet below.
 Download the Docker security cheatsheet
Note: in a managed environment like Kubernetes, most of these settings can be overridden by a Security Context or other higher-level security rules. See more
Build Configuration
Check your images
Carefully choose your base image when you docker pull image:tag
You should always prefer using a trusted image, preferably from the Docker Official Images, in order to mitigate supply chain attacks.
If you need to choose a base distro, Alpine Linux is recommended since it is one of the lightest available, ensuring the attack surface is reduced.
Do I need to use the latest or a fixed tag version?
First, you should understand that Docker tagging works from less to more specific, that’s the reason why :
python:3.9.6-alpine3.14

python:3.9.6-alpine

python:3.9-alpine

python:alpine
all refer to the same image (at the moment of writing) for example.
By being very specific and pinning down a version, you are shielding yourself from any future breaking change. On the other hand, using the latest version ensures that more vulnerabilities are patched. This is a tradeoff, but pinning to a stable release is what is generally recommended.
Considering that, we would pick python:3.9-alpine here.
Note: the same applies to packages installed during the build process of your image.
Always use an unprivileged user
By default, the process inside a container is run as root (id=0).
To enforce the principle of least privilege, you should set a default user. For this you have two options:
- Either specify an arbitrary user ID that won’t exist in the running container, with the
-uoption:docker run -u 4000 <image>
Note: if you later need to mount a filesystem, you should match the user ID you are using to the host user in order to access the files.
- Or anticipate by creating a default user in your Dockerfile:
FROM <base image>

RUN addgroup -S appgroup \
 && adduser -S appuser -G appgroup

USER appuser

... <rest of Dockerfile> ...
Note: you would need to check what tool is used to create users and groups in your base image.
Use a separate User ID namespace
By default, the Docker daemon uses the host’s user ID namespace. Consequently, any success in privilege escalation inside a container would also mean root access both to the host and to other containers.
To mitigate this risk, you should configure your host and the Docker daemon to use a separate namespace with the --userns-remap option. See more
Handle environment variables with care
You should never include sensitive information in plaintext in an ENV directive: they are simply not a safe place to store any bit of information you don’t want to be present in the final layer. For example, if you thought that unsetting an environment variable like this:
ENV $VAR
RUN unset $VAR
Was safe, you are wrong! $VAR will still be present in the containers and could be dumped anytime!
To prevent runtime read access, use a single RUN command to set and unset the variable in a single layer (don’t forget the variable can still be extracted from the image).
RUN export ADMIN_USER="admin" \
    && ... \
    && unset ADMIN_USER
More idiomatically, use the ARG directive (ARG values are not available after the image is built).
Unfortunately, secrets are too often hardcoded into docker images’ layers, that’s the reason we developed a scanning tool leveraging GitGuardian secrets engine to find them:
ggshield scan docker <image>
More on scanning images for vulnerabilities later.
Don’t expose the Docker daemon socket
Unless you are very confident with what you are doing, never expose the UNIX socket that Docker is listening to: /var/run/docker.sock
This is the primary entry point for the Docker API. Giving someone access to it is equivalent to giving unrestricted root access to your host.
You should never expose it to other containers:
-v /var/run/docker.sock://var/run/docker.sock
Privileges, capabilities and shared resources
First, your container should never be running as privileged, otherwise, it would be allowed to have all the root capabilities on the host machine.
To be even safer, it is recommended to explicitly forbid the possibility to add new privileges after a container has been created with the option --security-opt=no-new-privileges.
Second, capabilities are a Linux mechanism used by Docker to turn the binary “root/non-root” dichotomy into a fine-grained access control system: your containers are run with a default set of enabled capabilities, which you most probably don’t all need.
It’s recommended to drop all default capabilities and only add them individually: see the list of default capabilities
for instance, a web server would probably only need the NET_BIND_SERVICE to bind to a port under 1024 (like port 80).
Third, don’t share the sensitive parts of the host filesystem :
- root (/),
- device (/dev)
- process (/proc)
- virtual (/sys) mount points.
If you need access to host devices, be careful to selectively enable the access options with the [r|w|m] flags (read, write, and use mknod).
Use Control Groups to limit access to resources
Control Groups are the mechanism used to control access to CPU, memory, disk I/O for each container.
By default, a container is associated with a dedicated cgroup, but if the option --cgroup-parent is present, you are putting the host resources at risk of a DoS attack, because you are allowing shared resources between the host and the container.
In the same idea, it is recommended to specify memory and CPU usage by using options like
--memory=”400m”
--memory-swap=”1g”

--cpus=0.5
--restart=on-failure:5
--ulimit nofile=5
--ulimit nproc=5
See more on resources constraints
Filesystem
Only allow read access to the root filesystem
Containers should be ephemeral and thus mostly stateless. That’s why you can often limit the mounted filesystem to be read-only.
docker run --read-only <image>
Use a temporary filesystem for non-persistent data
If you need only temporary storage, use the appropriate option
docker run --read-only --tmpfs /tmp:rw ,noexec,nosuid <image>
Use a filesystem for persistent data
If you need to share data with the host filesystem or other containers, you have two options:
- Create a bind mount with a limited useable disk space (
--mount type=bind,o=size) - Create a bind volume for a dedicated partition (
--mount type=volume)
In either case, if the shared data doesn’t need to be modified by the container, use the read-only option.
docker run -v <volume-name>:/path/in/container:ro <image>
or
docker run --mount source=<volume-name>,destination=/path/in/container,readonly <image>
Networking
Don’t use Docker’s default bridge docker0
docker0 is a network bridge that is created on start to separate the host network from the container network.
When a container is created, Docker connects it to the docker0 network by default. Therefore, all containers are connected to docker0 and are able to communicate with each other.
You should disable this default connection of all the containers by specifying the option --bridge=none and instead, create a dedicated network for every connection with the command:
docker network create <network_name>
And then use it to access the host network interface
docker run --network=<network_name>
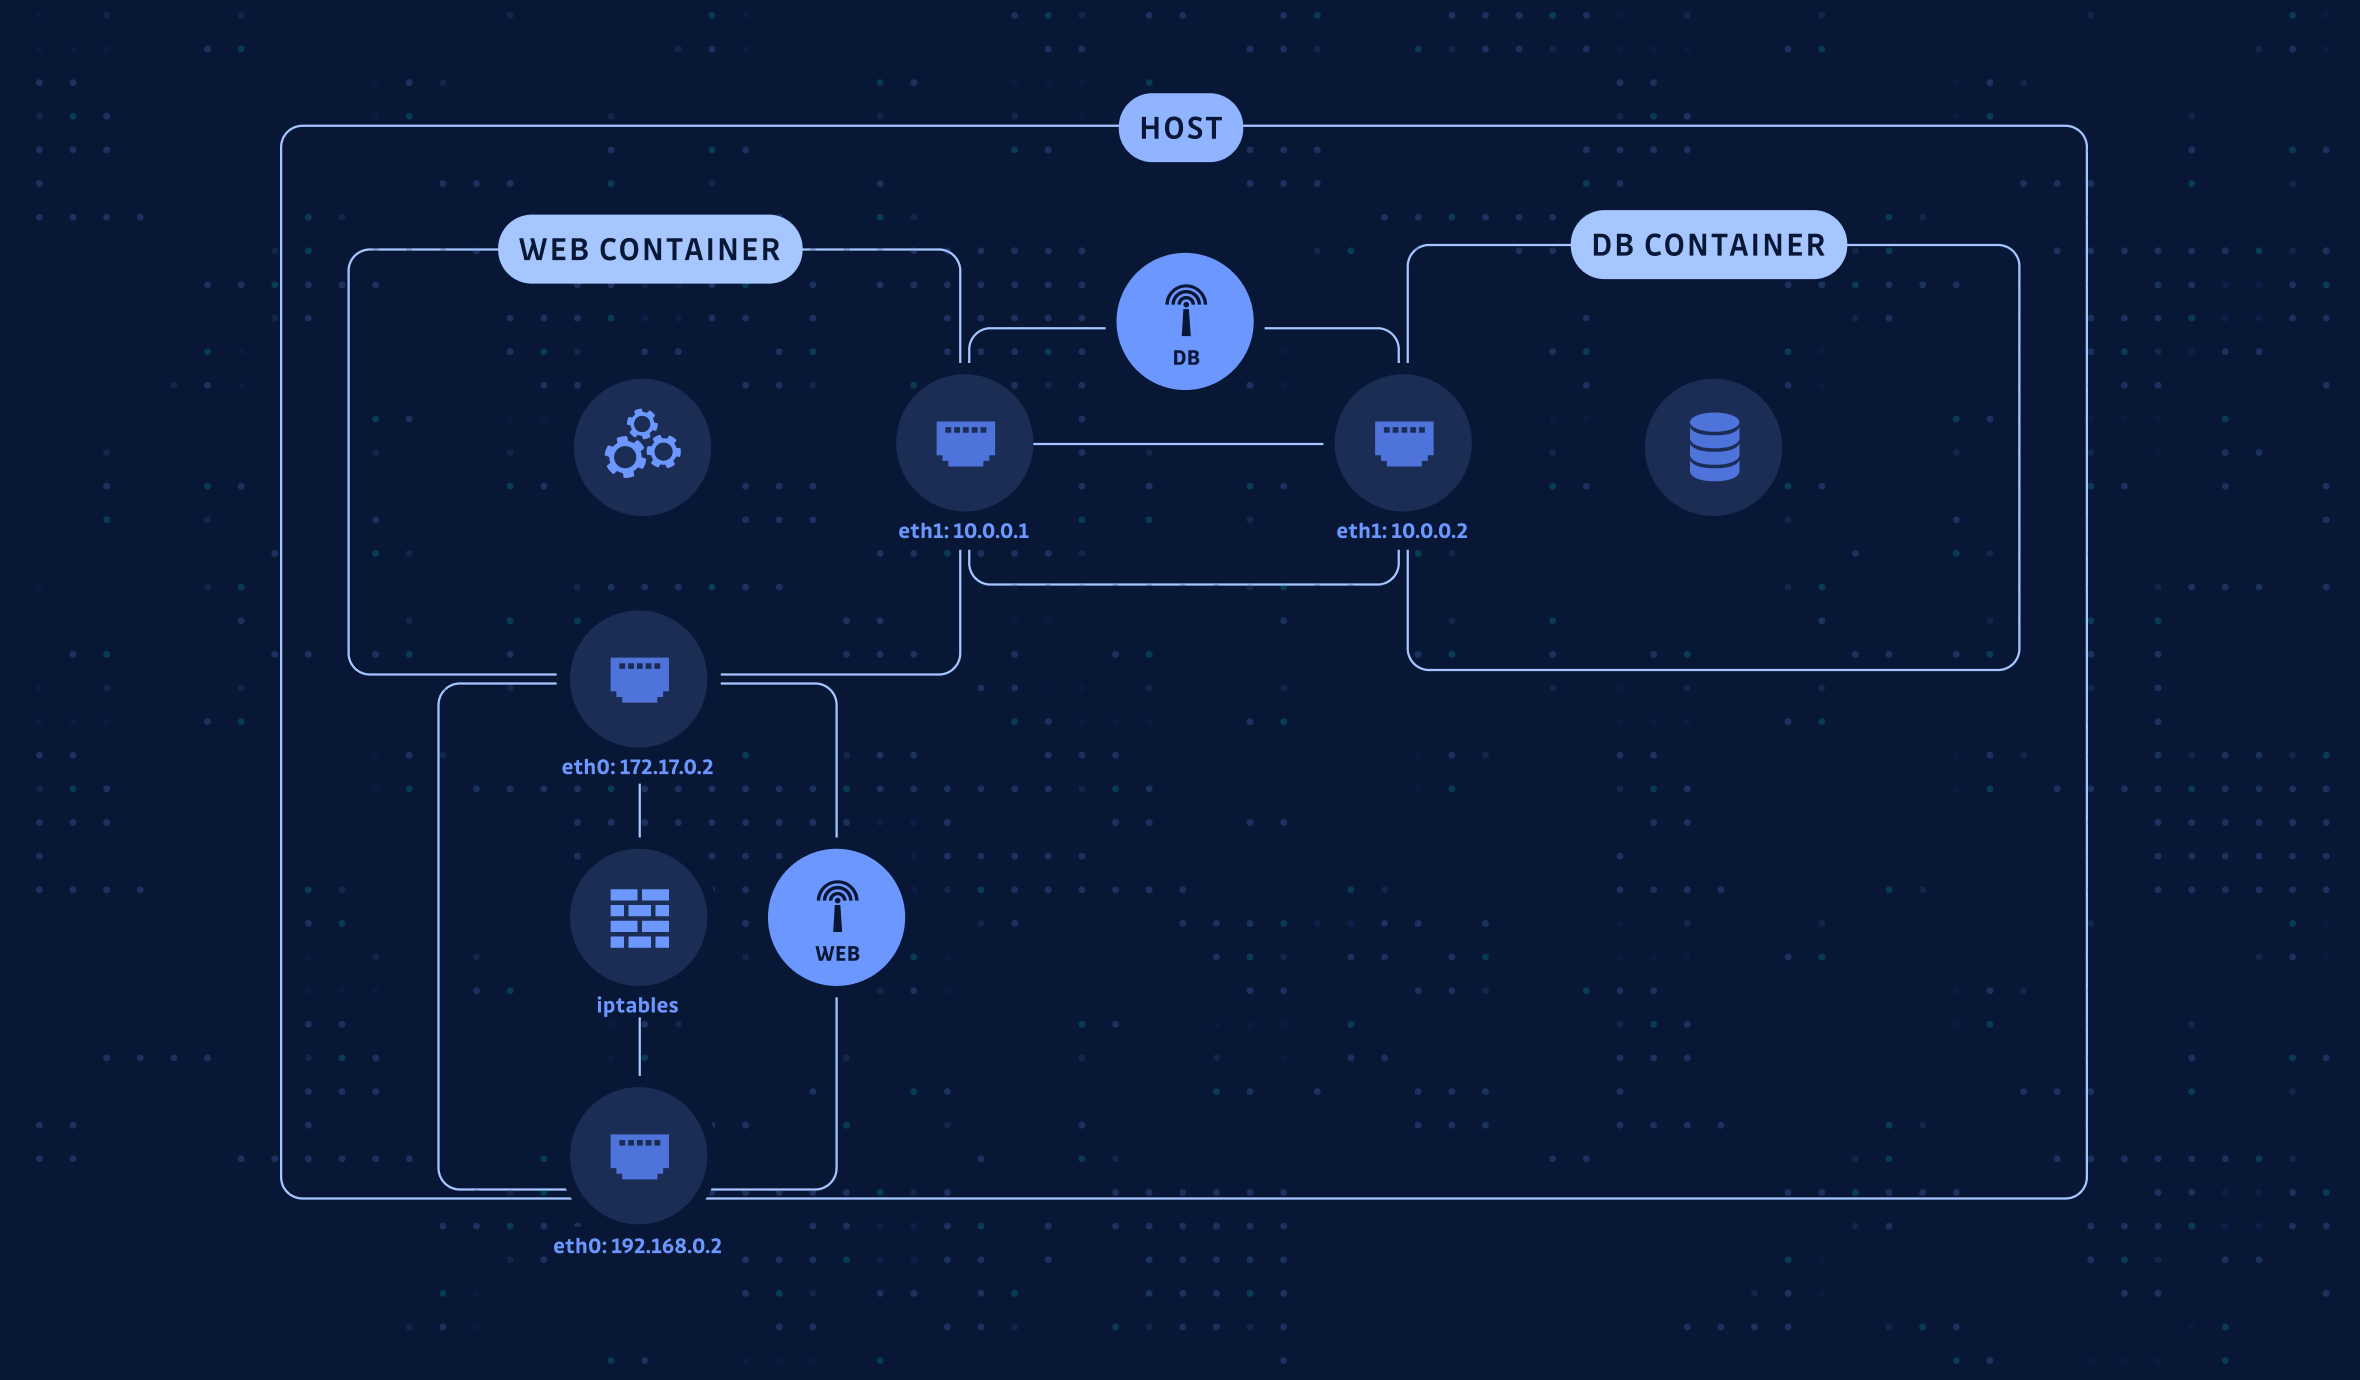
Docker networking simple example
For example, to create a web server talking to a database (started in another container), the best practice would be to create a bridge network WEB in order to route incoming traffic from the host network interface and use another bridge DB only used to connect the database and the web containers.
Don’t share the host’s network namespace
Same idea, isolate the host’s network interface: the --network host option should not be used.
Logging
The default logging level is INFO, but you can specify another one with the option:
--log-level="debug"|"info"|"warn"|"error"|"fatal"
What is less known is the log export capacity of Docker: if your containerized app produces event logs, you can redirect STDERR and STDOUT streams to an external logging service for decoupling using the option --log-driver=<logging_driver>
You can also enable dual logging to preserve docker access to logs while using an external service. If your app uses dedicated files (often written under /var/log), you can still redirect these streams: see the official documentation
Scan for vulnerabilities & secrets
Last but not least, I hope it is now clear that your containers are only going to be as safe as the software they are running. To make sure your images are vulnerability-free, you need to perform a scan for known vulnerabilities.
Many tools are available for different use-case and in different forms:
Scanning for vulnerabilities:
- Free options:
- Commercial:
- Snyk (open source and free option available)
- Anchore (open source and free option available)
- JFrog XRay
- Qualys
Scanning for secrets:
- ggshield (open source and free option available)
- SecretScanner (free)
If you are interested in other cheat sheets about security we have put together these for you: