Media concept
Introduction to media concepts
Now let’s have a quick overview of media concepts. These concepts will be vital for us if we want to understand the latter sections of this article and FFmpeg’s workings. To keep this section brief, it is a higher-level, simplified explanation of these concepts.
Audio
We’ll briefly cover the following terms:
- Sampling rate
- Bitrate
- Channels
Sampling Rate
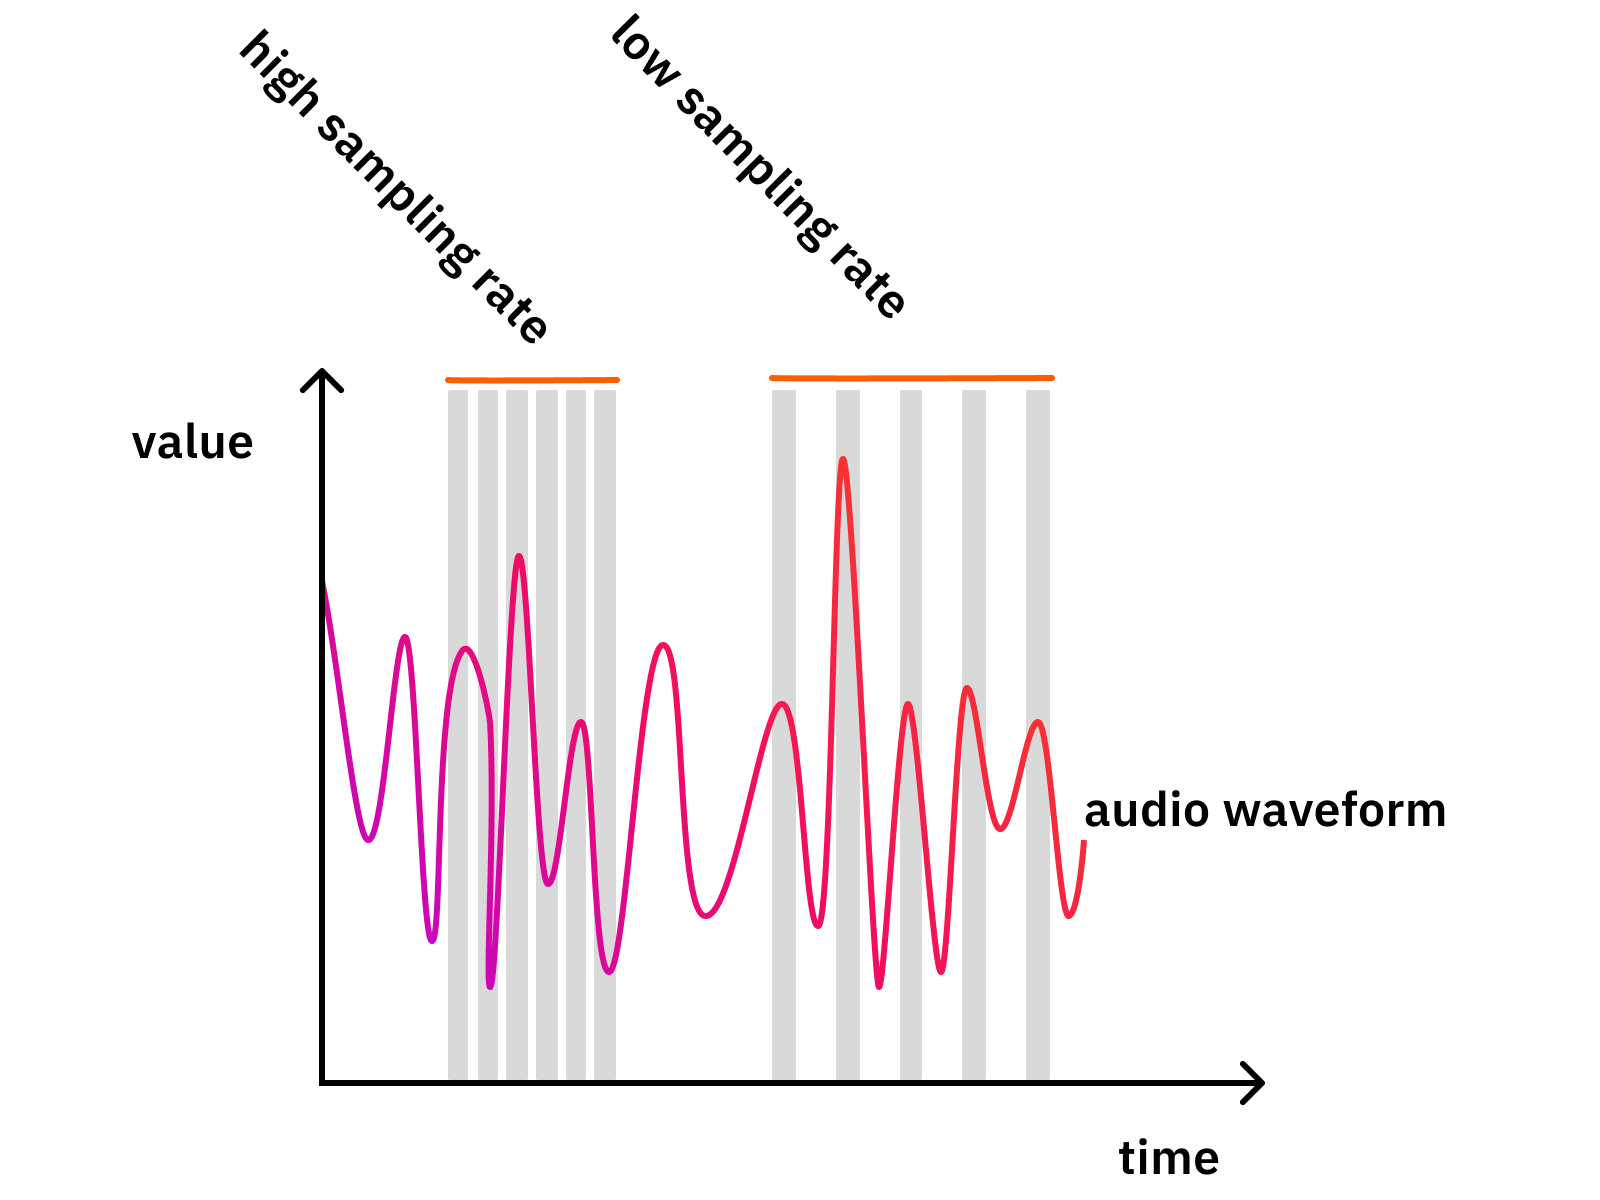
The sampling rate is the factor that shows how many times we measure/scan/sample the input data stream.
The image below shows the measurement windows (quantization) as gray bars.
Why does this matter? Because it is a balancing act. If we measure the signal less often, we’ll lose more details (bad). Also, by having fewer samples, we’ll have less data in the end. Therefore the file size will be smaller (good).
Here are some ballpark values:
- 8 kHz (GSM - Low quality)
- 44.1 kHz (CD - High quality)
- 48 kHz (Very high quality)
- 88.2 kHz (Insane - usually for production only)
- 96 kHz (Insane - usually for production only)
There are no definite “right answers” here. The question is what is “good enough” for your use case? GSM focuses on speech, and not even quality but understandability and the least possible amount of data. Therefore, they found that 8 kHz is enough (there are quite a few more tricks), for their purposes.
The “CD quality” aimed for high quality. Therefore they chose 44.1 kHz, that number has some history in it, but the main reason for aiming above 40 kHz lies in physics and how the human ear works.
There were two very smart guys whose theorem basically says that if you want a quite good signal representation, you have to sample it at twice the speed as its original frequency. Human hearing generally works up until about 20 kHz, so if you want “good quality”, you should aim for at least 40 kHz. And 40 kHz + some headroom + some more physics + historical reasons = 44.1 kHz! :)
As for the higher rates, those are only used when very high-quality audio editing is needed.
Bitrate
Bitrate represents the amount of data per second that results from our transcoding/quantization process. If it is 1411 kbit/s, that means that for every second of audio data, about 1411 kbit of output data will be produced.
Therefore, you can say that 1 minute of audio with 1411 kbit/sec will require:
(1411 kbit / 8) kbyte * 60 second = 10582 kbyte = 10.33 mbyte
Now, it is only easy like that with raw audio data and with a few simple codecs, e.g. PCM in WAVs.
Codecs compressing hard might throw your numbers around a little, as input data might be compressible with different rates. Variable bitrate is usually happening to save space. The encoder might output a lower bitrate if the data is “simple” and does not require high precision.
Here are some ballpark values:
- 13 kbits/s (GSM quality)
- 320 kbit/s (High-quality MP3)
- 1411 kbit/s (16bit WAV, CD quality, PCM)
Channels
Inside of most audio formats, you can have more audio channels. This means multiple, separated audio streams can be in the same file.
Many times, multiple channels have their own name:
- If you have a single microphone, you will most probably record it into a single channel called Mono.
- General music from the FM radio or streaming services usually has two channels in a so-called “Stereo” configuration.
With stereo, there could be several methods how the audio “image” can be made richer by leveraging audio panning, time and phase-shifting and much more. There is a special recording technique too, called Binaural recording, which is super awesome. Wear headphones for this, and don’t be scared:)
For example, here are Big Buck Bunny’s audio waveforms in Audacity:

You can see that there are two lines of waveforms and also that they are pretty similar. That is normal, as you usually hear the same thing with your two ears, but the matter is in the subtle differences between the two. That’s where directionality, richness, and all kinds of other effects lie.
But why stop at two? The list continues:
- 2.1, as it is often called, means three channels: 2 for stereo and one for the LFE (“low-frequency effects” a.k.a.: “bass”).
- 5.1 is similar, with five directional channels (2 front, 1 center, 2 rear) and the LFE.
So channels are just separate “recordings” or “streams” of audio signals.
Image properties
For images, there are quite a few parameters, but we’ll check out only these:
- Resolution
- Bit-depth
- Transparency
Resolution
An image consists of pixels, single points that have a single color. The resolution of an image determines how many columns and rows of pixels are in an image. In other words: an image has a width and a height.
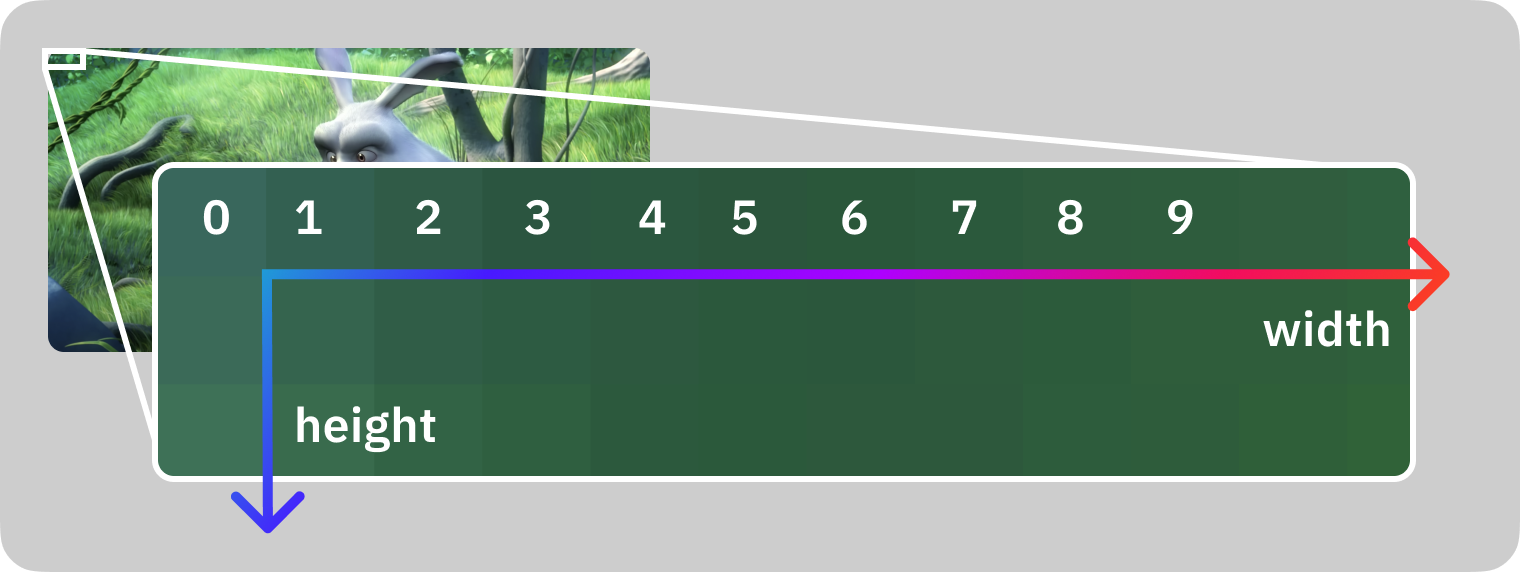
This image shows the first 10 pixels in the first row.
Here are some ballpark values for resolution:
- “HD” or “Full HD” or “1K” or “1080p” means 1920x1080 pixels.
- “4K” could mean a few values, but it should be about 3840x2160 pixels.
- A regular 16mp photo you make of your cat is about 4608x3456 pixels.
- General social media image posts are about 1080x1080 pixels.
Bit-depth
Bit-depth represents the number of bits used for storing a single pixel’s color value. This is the same balancing game, and you need to decide between quality or file size.
General ballpark values for bit-depth:
Bits
Colors
Notes
1
2
Black & White
8
256
B/W or Limited color palette
24
16.7m
3x8 bit for R-G-B “True color”
30
1073m
3x10 bit for R-G-B “Deep color”
These last two sometimes are referred to as “8 bit” or “10 bit” respectively, especially when talking about videos. That means 8/10 bits per single color channel.
Transparency
Some image formats support an additional channel together with the red, green, and blue components: the alpha channel. The alpha channel determines how transparent a single pixel is, and it can have different bit-depths, it is usually either 1, 8 or 16 bits.
If the alpha channel is 1 bit, then the format can encode a pixel to be either transparent or non-transparent. If it is 8 or more bits, then the format can encode 256 or more steps of transparency.
Video properties
Video data is built by single images shown right after each other. This brings in most attributes of images and a few more!
So a video has a resolution that is its width and height.
Then the first obvious parameter of a video is the framerate, which defines how many images are shown in a second. Common values for this are 24, 25, 30, or 60.
A video file also has a codec assigned to it, which is the format describing how all those images were compressed into this video file. There are many more attributes of videos, but this is a good start.
Video codecs
Compression is a super important thing when it comes to video because you have thousands of images to keep together. If you aren’t doing it in a smart way, then the resulting video will be very, very large.
Just imagine a 2-minute video, with 30 fps. That means it will have 60 s * 2 * 30 fps = 3600 frames! I have just taken a screenshot of an HD video, which was 730 kbyte in JPEG format. Now 3600 frame * 730 kbyte equals 2.5 gigabytes!
Can you imagine that? I hope not, and that’s because compression brings that way, way down, to the level of tens of megabytes. These days a video of that size is quite high quality and about 2 hours long. Also, don’t forget, that JPEG is already compressed, a single frame would be 6 mbyte when uncompressed. Now that 2-minute video would be 21 gigabytes if we’d store it uncompressed.
Standard codecs such as H.264 and H.265 are doing very clever and complex operations to achieve high compression ratios with good quality.
Just think about that, most frames in a video are quite similar, only containing small differences. So if we could only store that little difference between frames, we’d won a huge bonus! And that’s just one of the many tricks codecs do.
Codec designers are also exploiting the weaknesses and features of the human eye. Such as the fact that we are more sensitive to light intensity changes than color changes (say hello to YUV). And they can get away with lower quality details for parts that are moving fast, and so on.
Because why lose precious bits for things that you can’t even notice?!
There are many codecs out there, with different goals in mind, although the majority focus on keeping the file size low.
- H.264, H.265: These are the most common ones, with the widest support in browsers, phones, players, etc. It focuses on small file sizes with good quality. (At the cost of resource intensiveness.)
- Apple ProRes, DNxHD: These are common formats for production. They focus on quality and ease of processing and not on file size.
Audio codecs
The goal of audio codecs is the same as what we saw with the video codecs. It is just harder to demonstrate it as audio does not consist of single image frames but audio frames/packets. So an analog audio signal is of an almost infinite, or at least very high quality if you think of it.
At the lowest level, the speed and amplitude resolution is very high. We could say “atomic”, as we need to measure and store the speed and direction of atoms. So if you want to store that exactly, that will require a super high-quality measurement, which will also result in a very high bitrate data stream.
Thankfully, the sound is at least not propagating with light speed so we can save quite a lot just by that fact. (There’s no need for an extreme sampling rate.) Then our hearing is very limited if we take the previous paragraph as a scale, so we win there again. We don’t need most of that high precision that is there.
But still, if we take our hearing capability and want to store raw audio data with about 44.1 kHz of sample rate with about 1 Mbit/sec bitrate, we’d still get quite a lot of data. Check the calculations in the audio bitrate section above.
So raw audio can be compressed further, which is what many popular codecs do. They also exploit the human senses, but this time the human ear. We started with the basics that the human ear has a limit on the frequencies it can detect. Therefore, we can save a lot by cutting out the range of frequencies outside our hearing range. Unless you are a bat, you are fine between 20-20khz! :)
But there are other tricks, for example, auditory masking. That means that the presence of one frequency can affect your capability to detect a different frequency. From the codec’s viewpoint, it can skip encoding a few frequencies if it is smart enough to know which ones you’ll not notice. I’m sure there are a lot more tricks, let me know if you know about a few more interesting ones!
Here is a list of common codecs:
- MP3, AAC, OGG: These are common lossy audio formats.
- PCM (e.g. in a WAV container), FLAC: These are lossless formats.
- MIDI: It is a funny format. It is like a music sheet that might sound different on different players or settings. It is usually not made from real audio data, but from recording a digital keyboard or as an output from an audio composing software.
Containers
Now we got through the fundamental building blocks, the image, the video, the video codecs, and the audio codecs, and we reached the top of this iceberg: the containers.
A container is a format specification, that combines all these streams into a single file format. It defines how to put all these data together, how to attach metadata (e.g. author, description, etc), how to synchronize these streams, and sometimes a container even contains indexes to aid seeking.
So, for example, a MOV container can contain an H.264 video stream and an AAC audio stream together.
Common containers:
- MOV
- MP4
- MKV
- WebM
- WAV (audio only)
Example Material
I will use these example materials as inputs in the following parts of this article. If you’d like to follow along, save these files for yourself!
| Name | Resource |
|---|---|
| Big Buck Bunny | http://distribution.bbb3d.renderfarming.net/video/mp4/bbb_sunflower_1080p_60fps_normal.mp4 |
| Train | train.jpg |
| Smiley | smiley.png |
| Voice recording | voice_recording.wav |
| Big Buck Bunny’s audio | ffmpeg -i bbb_sunflower_1080p_60fps_normal.mp4 -map 0:1 bbb_audio.wav |
And we will make our own audio file by extracting the audio from the Big Buck Bunny movie! We’ll use this file as an example, so after downloading the video file, please execute this:
ffmpeg -i bbb_sunflower_1080p_60fps_normal.mp4 -map 0:1 bbb_audio.wavBy the middle of this article, you’ll understand this command, but for now, just make sure to have the WAV file next to your video file to test out the commands later in the article.
We’ll use these files in the following parts of this article. Therefore make sure to get them!