FFmpeg
- audio manipulation with ffmpeg
- basic editing with ffmpeg
- editing video with ffmpeg
- ffmpeg cli examples
- ffmpeg cli
- ffmpeg concept
- ffmpeg useful commands
- ffplay
- ffprobe
- filtering overview with ffmpeg
- media concept
- transcoding audio with ffmpeg
- transcoding video with ffmpeg
Introduction to FFmpeg
FFmpeg.org’s definition is the following: “FFmpeg is the leading multimedia framework, able to decode, encode, transcode, mux, demux, stream, filter and play pretty much anything that humans and machines have created. It supports the most obscure ancient formats up to the cutting edge. No matter if they were designed by some standards committee, the community or a corporation.”
I think of FFmpeg as the go-to application for audio/video manipulation in an automated or scripted manner.
When you need to implement a service that manipulates video, or just have 300 media files that need to be converted into a different format, FFmpeg is your - nerdy - friend.
FFmpeg can do large chunks of the basic functionalities of a modern Non-linear (NLE) video editors, e.g., Davinci Resolve Studio or Premiere Pro. But, it does not have a graphical interface in that sense as those behemoths do, and unarguably it is way less friendly.
In a general NLE, you might do things like these:
- Click to import a file
- Drop it into the timeline
- Trim and Cut
- Add an overlay image
- Crop that overlay
- Add vignette
- Add some color changing effects, e.g. change the hue
- Add an extra audio track to the mix
- Change the volume
- Add some effects, e.g.: echo
- Export into various formats
- Export into a deployable video format
- Export the master audio in wav
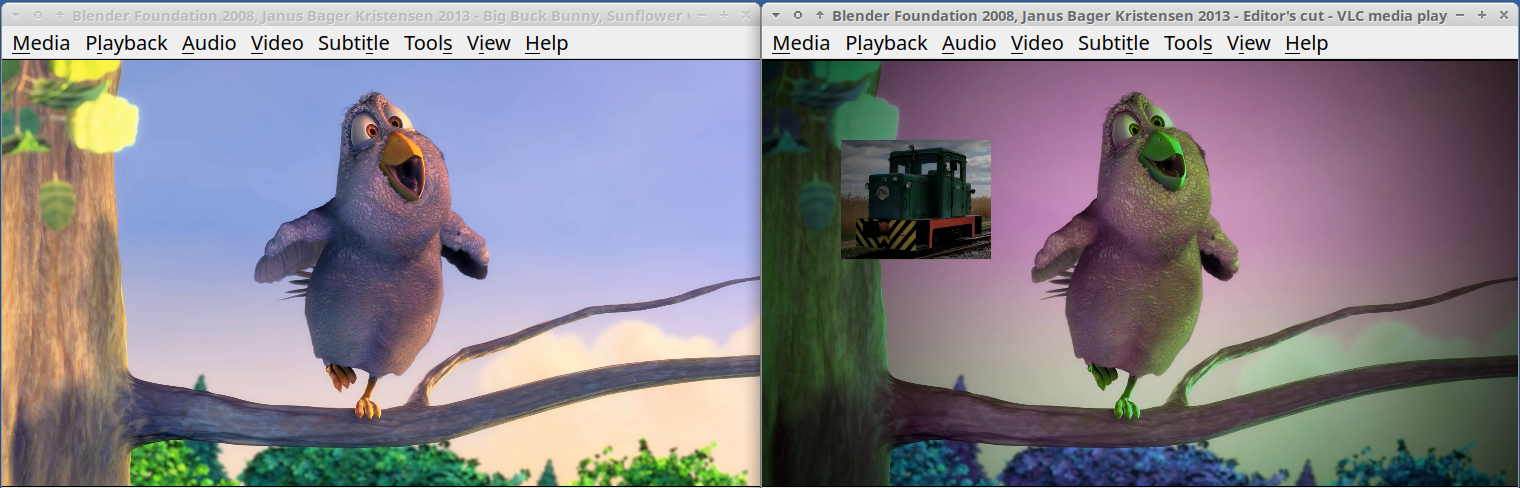
Or, to achieve the exact same thing, you could also execute this command:
ffmpeg -y  \
    -ss 20 -t 60 -i bbb_sunflower_1080p_60fps_normal.mp4 \
    -i train.jpg \
    -ss 4 -i voice_recording.wav \
    -filter_complex "[0:v]hue=h=80:s=1[main] ; [1:v]crop=w=382:h=304:x=289:y=227[train] ; [main][train]overlay=x=200:y=200,vignette=PI/4[video] ; [2:a]volume=1.5,aecho=0.8:0.9:100:0.3[speech] ; [0:a][speech]amix=duration=shortest,asplit[audio1][audio2]" \
    -map '[video]' -map '[audio1]' -metadata title="Editor's cut" bbb_edited.mp4 \
    -map '[audio2]' bbb_edited_audio_only.wav
Yes, it isn’t friendly at all, but it is very, very powerful once you become friends with FFmpeg.
Check out this comparison of the original and the edited one:
If you want to try this command out, get the example files and see it for yourself!
Installing FFmpeg
FFmpeg is available for most common and even uncommon platforms and architectures. You can be on Linux, Mac OS X or Microsoft Windows, and you’ll be able to run or link to FFmpeg.
Installing FFmpeg is easy on most platforms! There is no installer, usually just a compressed archive you need to get for your platform and architecture.
In the case of Linux, most distributions include a pre-built FFmpeg in their software repositories. Therefore, you can install FFmpeg from those even more quickly.
FFmpeg history
The project was started in 2000 by the awesome Fabrice Bellard. The name is a concatenation of “FF” meaning “fast-forward” and MPEG, the name of a video standards group. It has been very well, active and alive since then, releasing a new release about every three months.
FFmpeg supported codecs and formats
The default FFmpeg shipped with my Ubuntu Linux distribution supports about 460 codecs and 370 formats.
See it for yourself:
ffmpeg -codecs
ffmpeg -formats
Compilation of FFmpeg
Keep in mind that the supported codecs and formats (and filters, demuxers, muxers, input and output methods, etc.) are highly dependent on the so-called compilation flags.
This means that the above number only represents the fact that it supports at least this many codecs and formats. Still, there are even more that the package builders excluded for various reasons, e.g.: licensing, architecture, size considerations, etc.
Since FFmpeg is open source, you can compile FFmpeg for yourself at any time.
Suppose for example, that you care about your layer’s size (therefore the bootstrap speed) in AWS Lambda. In this case, you can compile an FFmpeg binary that only contains the mp3 encoder for example, and nothing else.
Also, you might not want to run into licensing issues and leave out stuff that would cause problems for your use case. Therefore you choose to leave out particular codecs/formats. I highly recommend checking out the “—enable-gpl”, “—enable-nonfree” and “—enable-version3” compilation flags in this case, as well as this.
Or you might want to have a standalone FFmpeg binary in your project (e.g.: embedded, or some cloud instance), that does not depend on any operating system libraries. Then you want to make a so-called static build, that compiles in all the libraries into a single binary file, and does not depend on your OS’ libraries and the runtime loading of other FFmpeg libraries. Search around for “—enable-static” in this case.
Finally, you can find pre-built static FFmpeg builds right here too.
FFmpeg’s strengths
FFmpeg reads and writes most video and audio formats that matter for most of us. It is a very capable and high-performance tool for converting and manipulating these formats.
But FFmpeg can do even more!
Filtering
FFmpeg has vast amounts of filters for audio and video. Therefore, video manipulation is also a key feature of FFmpeg.
Hardware acceleration
It does support many kinds of hardware accelerations! Video encoding is a very resource-intensive operation, and you might come across quite a few hardware devices or features that might speed up your process!
Most notably, if you have an NVIDIA card, you can increase your H.264 or H.265 encoding and decoding throughput by multipliers compared to your CPU. But other things, such as VDPAU, VAAPI, or OpenCL, can be leveraged to boost your pipeline’s throughput.
Learn more about the supported hardware acceleration methods here.
Versatile input/output methods
FFmpeg is also very capable when it comes to accessing input and output data.
Just to name a few: it can use your webcam, record from your microphone, grab your screen, or capture from your Blackmagic DeckLink. But FFmpeg can download directly from a web address, open all kinds of streams, read from a pipe, a socket, and of course, from files.
The same holds true for outputting the data. It can write to your webcam, play audio on your microphone… Just kidding:) It can output to files, streams, pipes, sockets and so on.
Running example commands
This article is full of FFmpeg commands that are working examples. The reason for that is that you could test these out for yourself! But the command line interfaces of different operating systems are slightly different, so the commands in this article are meant to be executed in a Linux bash shell.
To adopt these command lines to Microsoft Windows, you might need to:
- Change (cd) into the directory where you extracted the ffmpeg.exe. Alternatively, add that directory to the path to make it callable from anywhere.
- You might need to replace “ffmpeg” to “ffmpeg.exe”
- You will need to replace ”**“-s (backslashes) at the end of the lines with ”^**“-s (hats)
- You’ll need to replace the
fontfileargument’s value to something like this:fontfile=/Windows/Fonts/arial.ttfto get commands with the drawtext filter working.
MacOS users will need steps #1 and #4.
Documentation
For your convenience, let me list the most important documentations that might be important for you! Most of these were already linked many times in this article.